Icon Editor

 |
This page is under construction. This page or section is currently in the middle of an expansion or major revamping. However, you are welcome to assist in its construction by editing it as well. Please view the edit history should you wish to contact the person who placed this template. If this article has not been edited in several days please remove this template. Please don't delete this page unless the page hasn't been edited in several days. While actively editing, consider adding {{inuse}} to reduce edit conflicts. |
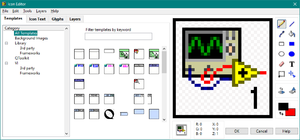
The Icon Editor dialog box is a built-in tool in the LabVIEW IDE to help create custom icons for VIs. The VI Icon is an important documentation tool because it controls the appearance of the VI as a SubVI on the Block Diagram. In LabVIEW 2009 the Icon Editor was completely redone. This page is for the Icon Editor for LabVIEW 2009 and later. For the Icon Editor before LabVIEW 2009 see the page Icon Editor (LabVIEW 8.6 and Earlier).
Accessing the Icon Editor
To access the Icon Editor do one of the following: From the Block Diagram, Front Panel, or Control Editor windows:
- Double-click on the Icon
- Right-click on the Icon and select, Edit Icon...
- Select File»VI Properties or File»Control Properties to display the VI Properties dialog box or Control Properties dialog box, respectively. Then select General from the Category pull-down menu and click the Edit Icon button.
- Right-click a project library, statechart, class, or XControl item in the Project Explorer window and select Properties from the shortcut menu to display the corresponding Properties dialog box. Then click the Edit button on the General Settings page.
Editing Tools
The editing tools are the set of buttons right of the Icon Edit Area. The tools consist of the following:
| Symbol | Tool Name | Actions | |||
|---|---|---|---|---|---|
| Single Click | Double Click | Left-Click in Edit Area | Right-Click in Edit Area | ||
| Pencil Tool | Selects Tool | Nothing | Draws individual pixels with the Line Color (or if starting pixel is the Line Color toggles to using the Fill Color) | Draws individual pixels with the Fill Color (or if starting pixel is the Fill Color toggles to using the Line Color) | |
| Line Tool | Selects Tool | Nothing | Draws line by with Line Color | Draws line by with Fill Color | |
| Dropper Tool | Selects Tool | Nothing | Selects the color clicked on as the Line Color | Selects the color clicked on as the Fill Color | |
| Fill Tool | Selects Tool | Nothing | Fills all connected pixels of the Line Color | Fills all connected pixels of the Fill Color | |
| Rectangle Tool | Selects Tool | Adds a one-pixel border to the entire icon in the Line Color | Draws a rectangle with the Line Color | Draws a rectangle with the Fill Color | |
| Filled Rectangle Tool | Selects Tool | Adds a one-pixel border to the entire icon in the Line Color and fills the icon in the Fill Color | Draws a rectangle with the Line Color as the border filled in with the Fill Color | Draws a rectangle with the Fill Color as the border filled in with the Line Color | |
| Ellipse Tool | Selects Tool | Nothing | Draws an ellipse with the Line Color | Draws an ellipse with the Fill Color | |
| Filled Ellipse Tool | Selects Tool | Nothing | Draws an ellipse with the Line Color as the border filled in with the Fill Color | Draws an ellipse with the Fill Color as the border filled in with the Line Color | |
| Eraser Tool | Selects Tool | Nothing | Draws individual pixels as transparent | Draws individual pixels as transparent | |
| Text Tool | Selects Tool | Display the Text Tool page of the Icon Editor Properties dialog box. Use this page to specify the font, alignment, and font size of the text you enter with the Text tool. | Either click places the starting position of the text. While text is active, you can move the text by pressing the arrow keys. Note: This text is not the same as the Text layer. | ||
| Select Tool | Selects Tool | Select the entire icon | Draws selection rectangle. Note: You can cut, copy, or move pixels only from user layers which doesn't include the Template or Text layers. | ||
'
Templates
Icon Text
Glyphs
Layers
Icon Editor Properties
Best Practices
History
| Version | Change(s) |
|---|---|

|
In LabVIEW 2012 the Icon API is released as Object-Oriented Classes. It allows for scripting Icons with access to Text, Glyph, and user layers. |

|
In LabVIEW 2009 the Icon Editor was completely redone to allow different layers in an Icon with tabs for Templates, Icon Text, and Glyphs. See the page Icon Editor (LabVIEW 8.6 and Earlier) for the editor for LabVIEW 8.6 and earlier. |
See also
External links
- Enhanced Icon Editor - NI Community Page


