
Front Panel
The Front Panel of a VI contains the User Interface of the VI. The front panel can be simple with only a few inputs, (controls) and outputs (indicators) for a SubVI or complex with many controls, indicators, and decoration for an application interface. The Controls Palette or Quick Drop is used to select the type of control, indicator, or decoration to add to the front panel. By default the size and position of the front panel will dictate its running size and position
Creating a Front Panel
Adding Controls/Indicators
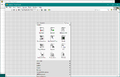
Via Controls Palette
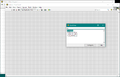
- Right-Click on a blank space on the Front Panel
- Navigate through the Controls Palette to find the desired Control or Indicator
- Click on the Control or Indicator. A dotted outline of it appears.
- Click on the Front Panel to place.
-
 Step 1
 -
 Step 2
 -
 Step 3
 -
 Step 4


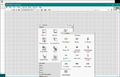
Via Quick Drop
- While on the Front Panel, press Ctrl-Space. The Quick Drop Window will appear.
- Type the name (or shortcut) of the Control or Indicator.
- Click on Front Panel to place.
-
 Step 1
 -
 Step 2
 -
 Step 3


Changing Front Panel Color
During Edit Time
During edit time the Front Panel color can be set using the Tools Palette, Set Color tool.
Changing Dynamically
While the VI is running, the color can be changed dynamically by using the Pane class/Pane Color property. This will mean that the Pane's reference will be required. Use the Panel class/Panes[] property to obtain an array of references to all of the panes owned by a Front Panel. If only one pane exists, there will be only one element in the array.
Best Practices
Organization
- For simple VIs, it is best practice to place inputs (controls) on the left side of the front panel and outputs (indicators) on the right side of the front panel in a manner that matches their position on the Connector Pane.
- For complex UIs see the page on User Interfaces.
Tips and tricks
General
- Press Ctrl and drag to make more space on the front panel (press Esc to abort).
- Press Alt+Ctrl and drag to remove space on the front panel (press Esc to abort).
- Press Ctrl and drag while using the Positioning tool to duplicate objects.
- Drag a block diagram constant to the front panel to create a control.
- Drag a front panel control into a control refnum to quickly create a typed reference.

- Right-click the application instance name on the status bar to quickly switch between application instances.

- Press Shift before moving an object, to restrict the direction to horizontally or vertically, respectively.
- Use the arrow keys to move selected objects.
- Press Shift to increase the movement speed.
 |
 |
 |
- Scroll on the horizontal scroll bar to scroll left and right.
- Scroll on the vertical scroll bar to scroll up and down.
- Press Shift while scrolling to scroll faster.
- Select Tools > Navigation Window to display an overview of the front panel or block diagram.
- Press Ctrl+T to split the screen between the front panel and block diagram. Press Ctrl+Z to undo this operation. (It may be convenient to disable this feature under Tools > Options > Menu Shortcuts because Ctrl+T and Ctrl+R are very close on the keyboard.)
Documentation
- Double-click any open space on the front panel to place a free label.
- Use the Set Color tool to change the background color of free labels.
- Choose the "T" option on the color picker for a transparent color.
- In the VI Properties dialog, select Documentation to add a link to an external HTML or compiled help file.
- Select File > Print to print VI documentation into various output formats.
- Use the system label (formally known as dialog label) from the controls palette, to label elements on the front panel. The background color of this label will automatically adjust to the background color of the owner (it is not transparent).

Connector pane
- Always leave some extra unused terminals on the connector pane of a VI to allow for later extensions without breaking existing code.
Resizing Objects
- When placing an object, keep dragging to resize it as it is placed.
- When resizing an object, hold Ctrl to resize from the center.
- When resizing an object, hold Shift to resize proportionally to its original size.
- Temporarily disable the alignment grid by pressing G.
- Press G again to re-enable the alignment grid.
Searching
- Select a control and press Ctrl+F to open the Find dialog with the selected element as search parameter.
- In the Search Results dialog, press Ctrl+G to go to the next match and Shift+Ctrl+G to go to the previous match.
Advanced
Properties
Front panel properties and be accessed via a panel refnum and a Property Node using the VI Server. See Panel Properties.
Methods
Front panel methods and be accessed via a panel refnum and an Invoke Node using the VI Server. See Panel Methods.
History
| Version | Change(s) |
|---|---|

|
In LabVIEW 2011 the default background color of the Front Panel was changed to a lighter shade of gray "to complement the appearance of the controls and indicators on both the Modern and Silver palettes."[1] |
See Also
References
- ↑ "LabVIEW 2011 Features and Changes" by NI (http://zone.ni.com/reference/en-XX/help/371361H-01/lvupgrade/labview_features/)