Icon Editor (LabVIEW 8.6 and Earlier)

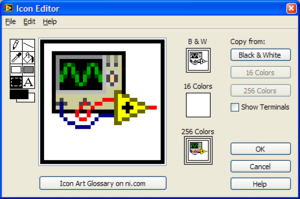
The Icon Editor dialog box is a built-in tool in the LabVIEW IDE to help create custom icons for VIs. The VI Icon is an important documentation tool because it controls the appearance of the VI as a SubVI on the Block Diagram. In LabVIEW 2009 the Icon Editor was completely redone. This page is for the Icon Editor for LabVIEW 8.6 and earlier. For the Icon Editor after LabVIEW 8.6 see the page Icon Editor.
Usage
How to Make icons smaller than the entire square
Sometimes it is desirable to make a LabVIEW subVI's icon smaller than the normal 32x32 pixels. National Instruments has done this with several primitives and has made it possible for end users to make custom icons of any size for a subVI. It is good practice to ensure that terminals used line up logically with the borders of the smaller VI created.
Starting with a typical icon editor
![]()
Clear the default icon from the 256 icon, then click on the "Show Terminals" checkbox. Draw a box, around the terminals you wish to have displayed on your custom icon.
![]()
Fill the 256 color icon with a color of your choice, as well as any words or symbols you wish to use to describe your subVI's work, then copy the subVI to the black and white icon by selecting the black and white icon and pressing the copy from 256 color button on the right.
![]()
You can even make irregularly shaped icons. The white area outside will be transparent in your diagrams. Interestingly, if the border you define is not contiguous, the inside of your icon will also be transparent (you can see a wire go all the way to its connection point (visible as a little cross in the "show terminals" icon view). You can actually have multiple non-transparent areas in your icons if you wish.
NOTE: White space icon transparency is lost if a VI edited in this way is used from within a Packed Project Library (PPL) distribution. The icon placed on a block diagram from a PPL reverts to its original 32x32 icon area with white fill in place of transparencies. This is the case for LabVIEW IDE versions as recent as 2017 SP1.
Alternative Icon Editors
As of LabVIEW 8.0 a custom icon editor could be built and called from LabVIEW to edit icons of VIs. The relevant information to replace the built in VI icon editor is available here.
Best practice
Tips and tricks

- Double-click the Text tool to quickly access the Text Tool Settings in the Icon Editor Properties dialog.
- Use font Small Fonts with size 8 for readable icon text.
- Double-click the Select tool to select all layers of an icon (this is a fast way to delete the default icon).
- Double-click the Rectangle tool to draw a rectangle of the size of the icon.
- Double-click the Filled Rectangle tool to draw a filled rectangle of the size of the icon.
- Press Ctrl to temporarily switch to the Dropper tool for the front color.
- Press Ctrl+Shift to temporarily switch to the Dropper tool for the back color.
- Use the arrow keys to move layers pixel-by-pixel.
- Leave empty space around an icon to draw a smaller icon.
- Drag an image over a VI icon on the front panel or block diagram to use the image as icon.
- Copy the icon of an existing VI or function from the block diagram into the Icon Editor with Ctrl+C and Ctrl+V.
- Use the Select tool to select a target area before pasting data from the clipboard to automatically fit the content inside the selected area (will size to fit).
Double Click
There are certain tools in the icon editor that are "double-clickable". Double clicking on the selection, filled box, and empty box tool icons in the editing palette will apply that tool to the entire icon square. Double clicking on the font tool will bring up a font dialog for selecting font name, size, color, justification, and style (bold, italics, etc).
Move text
While typing a text into the Icon Editor the text is movable by using the arrow keys on the keyboard.
History
| Version | Change(s) |
|---|---|

|
In LabVIEW 2012 the Icon API is released as Object-Oriented Classes. It allows for scripting Icons with access to Text, Glyph, and user layers. |

|
In LabVIEW 2009 the Icon Editor was completely redone to allow different layers in an Icon with tabs for Templates, Icon Text, and Glyphs. See the page Icon Editor for the editor for LabVIEW 2009 and later. |
See also
External links
- Enhanced Icon Editor - NI Community Page
