New dialog: Difference between revisions
| Line 76: | Line 76: | ||
|} | |} | ||
Where the ''%s'' under the <code><GUID></code> tag should be replaced with your GUID you generated and the '%s'' under the <code><ParentGUID></code> tag should be replaced with the GUID '''Other Files''' item. Replace the data in the ''Name'', ''ItemPath'', ''Description'', ''ImagePath'', and ''NDIconPath'' tags with the information about your component from above. Save the XML and restart [[LabVIEW]] to test. | Where the ''%s'' under the <code><GUID></code> tag should be replaced with your GUID you generated and the ''%s'' under the <code><ParentGUID></code> tag should be replaced with the GUID '''Other Files''' item. Replace the data in the ''Name'', ''ItemPath'', ''Description'', ''ImagePath'', and ''NDIconPath'' tags with the information about your component from above. Save the XML and restart [[LabVIEW]] to test. | ||
In the case of the [[QControl|QControl Toolkit]], editing the ''LVNewDialog.xml'' file and adding a node was done as a post-install step of the [[Package]] and removal of the node was done as a post-uninstall step of the [[Package]]. | In the case of the [[QControl|QControl Toolkit]], editing the ''LVNewDialog.xml'' file and adding a node was done as a post-install step of the [[Package]] and removal of the node was done as a post-uninstall step of the [[Package]]. | ||
Revision as of 18:48, 25 November 2020
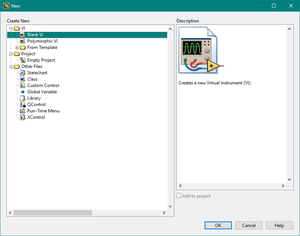
The New dialog provides access to create to VIs, Polymorphic VIs, Malleable VIs, LabVIEW Projects, LabVIEW Classes, LabVIEW Project Libraries, Custom Controls (see Control editor), Global Variables, Run-Time Menus, and XControls. VIs can be created from the New dialog using templates that create the VI with a common Design Patterns already established. Other toolkits, like QControls, add options to create other types of content to the New dialog. To access the New dialog from the Getting Started, Project Explorer, VI Front Panel, or VI Block Diagram windows, select File-->New... from the menu bar.

Dialog Parts
The main parts of the New dialog include:
- Create New is a tree control that displays starting points for VIs and other LabVIEW documents. Select an item from one of the following categories and click the OK button to start building a VI or other LabVIEW document.
- Description is a picture control that displays an image and a description of the component you selected in the Create New list.
- Add to project is a checkbox that specifies if the new component should be added to the project you select in the Projects pull-down menu. If no project is available, LabVIEW disables this checkbox.
- Projects is a drop-down combobox that specifies the project to which LabVIEW will add the selected component. This pull-down menu appears only if you have more than one project open.
- Note LabVIEW automatically selects and disables the Add to project checkbox. If no project is available, LabVIEW disables the OK button. If multiple projects are available, you can select the project to which you want to add the item from the Projects pull-down menu.
- The OK button starts creation of the selected component.
- The Cancel button dismisses the New dialog without creating the selected component.
- The Help button launches the LabVIEW Help to the help article about the New Dialog Box.
LabVIEW Documents
The LabVIEW Documents available to create by default include:
- VI—The items in this category create new VIs.
- Blank VI—Creates a new, blank Virtual Instrument (VI).
- Polymorphic VI—Creates a new, blank, Polymorphic VI.
- From Template—Opens a front panel and block diagram with components you need to build different types of VIs. Click a template in the From Template category of the Create new tree to display the front panel in the Front Panel Preview section, to display the block diagram in the Block Diagram Preview section, and to display a description of the template in the Template Description text box.
- Frameworks—Opens a front panel and block diagram with components and settings to build VIs for general purpose applications.
- Instrument I/O—Opens a front panel and block diagram with components to communicate with an external instrument attached to the computer through a port, such as a serial or GPIB-enabled device.
- Simulated—Opens a front panel and block diagram with components to simulate acquiring data from a device.
- User—Opens a VI with components from a template that you created.
- Browse—Opens a file dialog from which you can select a template.
- Project—The items in this category create new projects.
- Empty Project—Creates a project to manage VIs, support files, applications, and hardware configurations.
- Project from Wizard—The items in this category interactively create projects based on details you provide about the intended application.
- Other Files—Creates the tools you use to build other LabVIEW objects.
- I/O Server—(DSC or Real-Time Module) Creates an I/O server to communicate with and manage input/output devices. These I/O servers read selected input items and write to the selected input items on demand. You must have a project open to create an I/O server.
- Class—Creates a LabVIEW Class. LabVIEW classes are user-defined data types. LabVIEW classes are the basis for LabVIEW object-oriented programming.
- Custom Control—Creates custom user interface components that vary cosmetically from built-in LabVIEW controls and indicators. You also can use this option to create type definitions.
- Global Variable—Creates a container VI for Global variables that can be accessed from anywhere in the application.
- Library—Creates a LabVIEW Project Library.
- Run-Time Menu—Creates a Run-Time Menu.
- XControl—Creates an XControl that combines built-in LabVIEW controls and indicators. Unlike custom controls, XControls have dynamic run-time and edit-time behavior that is defined by VIs that run in the background.
- Note This item is available only in the LabVIEW Professional Development System.
New Dialog Source Code
The New dialog is written in G and the VI for the dialog box is located in the LabVIEW directory at: [LabVIEW 20xx]\resource\plugins\lv_new.vi. However, the VI is password protected so the block diagram cannot be accessed and the VI cannot be edited.
Adding to the New Dialog
You can add items to the New dialog without editing the source code. To do this you will need:
- A VI that launches your Wizard, or VI Scripting code that creates the component
- The path to where that VI will be installed (if installed by a Package or Installer)
- A PNG image that represents your component. This is used in the Description in the dialog. Size should be 256 x 256 pixels.
- A PNG image to be used as the icon in the Create New tree in the dialog. Size should be 16x16 pixels.
- A description of the component to be used in the Description in the dialog
- Generate a GUID for your component
After you have all these items, locate the LVNewDialog.xml file located in the LabVIEW directory at: [LabVIEW 20xx]\resource\plugins\NewDialogFiles\LVNewDialog.xml. To add a node to the XML file for your component you will need to read the file and find the GUID for the Other Files item in the tree. This becomes the <ParentGUID> in the node you will add.
- Note It is advisable to make a backup of your LVNewDialog.xml before beginning to edit it. It is not impossible to restore if the file is corrupted but it would require a reinstall of LabVIEW if you did.
An example of the XML code for a node is as follows (shown here from the QControl Toolkit):
|
<Node>
</Node> |
Where the %s under the <GUID> tag should be replaced with your GUID you generated and the %s under the <ParentGUID> tag should be replaced with the GUID Other Files item. Replace the data in the Name, ItemPath, Description, ImagePath, and NDIconPath tags with the information about your component from above. Save the XML and restart LabVIEW to test.
In the case of the QControl Toolkit, editing the LVNewDialog.xml file and adding a node was done as a post-install step of the Package and removal of the node was done as a post-uninstall step of the Package.
See Also
- VI Scripting
- VI
- LabVIEW Project
- LabVIEW Class
- LabVIEW Project Library
- Control
- Global variable
- Run-time menu
- XControl
- QControl
- Project Template
External Links
| |
Add links to external resources that would also help. |
