
Custom Project Template
A Custom Project Templates are a special plugin to the LabVIEW IDE that allows a developer to create a starting point for other developers. This starting point consists of a Project file that already contains some code. This code could be:
- VIs
- Libraries
- Classes with data and methods defined
- Build Specifications
Parts of a LabVIEW Project Template
There are four main components of a LabVIEW Project Template; three of which are customizable. These include:
- The Project Template Engine (not customizable)
- The Project Template
- The Specification Page
- The Scripting Code
The Project Template Engine
The Project Template Engine is launched by the LabVIEW IDE by selecting Create Project from the Getting Started Window or the Project Menu.


The developer is then presented with the Create Project dialog to allow them to select the Project Template they want.

An XML file must be included with your Project Template to define the information to display in this dialog and where to point to find the Project Template, Specification Page, and Scripting Code.
The Project Template
This is an actual Project file with all of the starting code. The engine will make a copy of this code in the location defined as the Project Root (see Specification Page).
The Specification Page
After making a selection and clicking Next, the developer is presented with the Specification Page. The default Specification Page, if not overridden and customized, will contain fields for Project Name and Project Root. These are used to set the Name and Location to copy the Project Template.
The Specification Page is customizable to get other input from the developer before continuing the creation of the new Project. At a minimum, the Project Name and Project Root must be set.
The Scripting Code
This is additional code that is executed after the engine has made a copy of the Project Template. This is optional.
Note: On the MetaDataObj
The MetaDataObj is the parent class that must be overridden to define the Specification Page and the Scripting Code.
The MetaDataObj is found in:
[LabVIEW 20xx]\resource\dialog\NewProjectWizard\MetaDataObj\MetaDataObj.lvclass
More information will be given in the Instructions.
Creation Instructions
- Create folders in your repo to contain at least two Projects. One of these Projects is for the Project Template and the other is for the Specification Page and Scripting Code.
- Create the first project file for the Project Template. Add all code that you want copied with a new project made from this Project Template. This can be simple or complex. Add documentation to the VIs descriptions and block diagrams letting the developer know why that code exists and where to start when adding or modifying it.
- Create the second project file for the Specification Page and Scripting Code. Create a Class and change its inheritance to the MetaDataObj.lvclass mentioned earlier.
- Create the Specification Page.
- As an example, you can copy and modify the default Specification Page from LabVIEW. It is located in the LabVIEW folder at:
- C:\[Program Files]\National Instruments\[LabVIEW 20xx]\resource\dialog\NewProjectWizard\SpecPage.vi
- The Specification Page has two inputs:
- The MetaDataObj that you can then cast to your more specific child class.
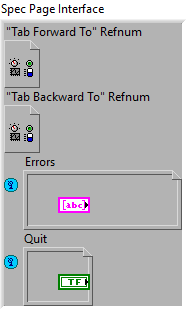
- The Spec Page Interface includes two Control References that need to be loaded and two User Events, one of which, the Quit event, needs to be registered for.
Spec Page Interface
- All other code in the Specification Page is custom to your needs but you must define the new Project Name and Project Root path at a minimum.
- The last page to finish the Specification Page is to override the Dynamic Accessor, Spec Page Path. This tells the engine the path to this Specification Page. An easy way to do this so that the path is correct even after it is installed is to use a Static VI reference, as shown:
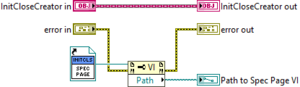
Override Spec Page Path Dynamic Accessor
- Create the Scripting Code.
- There are two templates for the scripting code whether you want it to have UI or not. Most of the time we have used the AfterPage2_NoUI.vit. The two templates are found at:
- C:\Program Files (x86)\National Instruments\LabVIEW 2019\resource\dialog\NewProjectWizard\AfterPage2_Templates
- The “AfterPage2_” part refers to the order of the execution:
- Page 1 is the Create Project dialog with the selection of Project Templates.
- Page 2 is the Specification Page.
- AfterPage 2 is the Scripting Code with or without additional UI.
- The VI created by using the AfterPage2_NoUI.vit can be saved to whatever name you want. It is recommended that add it to your Class that is a child of the MetaDataObj.
- The inputs given to this VI from the engine include a reference to the new project and the MetaDataObj from the Specification Page.
- Edit the MetaData XML File.
- The XML file can have one or more entries. An entry looks like this:


<ProjectTemplate>
    <Title>TASC InitClose</Title>
    <Description>InitClose Override</Description>
    <Filters>TASC</Filters>
    <LocationPath>TesteractTASCTemplates</LocationPath>
    <ListboxImagePath>Graphics/TASC_InitClose.png</ListboxImagePath>
    <ProjectPath>Templates/InitCloseTemplate/TASC_InitClose_Template.lvproj</ProjectPath>
    <Keywords>TASC;InitClose</Keywords>
    <SortPriority>0</SortPriority>
    <HidePrefix>TRUE</HidePrefix>
    <MetaDataClass>ProjectCreators/InitCloseProjectCreator/InitCloseProjectCreator.lvclass</MetaDataClass>
    <CustomVIMode>AfterPage2NoUI</CustomVIMode>
    <CustomVIPath>ProjectCreator/Create Project.vi</CustomVIPath>
</ProjectTemplate>
Here is the Description of all Required and Optional XML Tags:
| XML Tag | Description | Example Project |
|---|---|---|
| Required Tags | ||
| <Title> | Defines the title of the project as it appears in the Create Project dialog box. | All projects |
| <Description> | Defines the description of the project as it appears in the Create Project dialog box. | All projects |
| <Filters> | Determines filters for the project, which allow users to filter items in the Create Project dialog box by category. Use a colon to separate categories and a semicolon to separate multiple filters. | All projects |
| <LocationPath> | Specifies the path to the directory that contains source files for the project. Use a forward slash (/) as the path separator. This path is relative to the ProjectTemplates/Source directory. All other paths in the metadata for the project are relative to the path you provide in the <LocationPath> tag. | All projects |
| <ListboxImagePath> | Specifies the path to the image you want LabVIEW to display beside the project title in the Create Project dialog box. Ensure that the dimensions of the image are 32x32 pixels. | All projects |
| <ProjectPath> | Specifies the path to the .lvproj file for the project. If you set the value of the <CustomVIMode> to AfterPage1, this tag is optional. | Simple State Machine |
| Optional Tags | ||
| <Keywords> | Determines which keywords users can enter in the Additional Search box of the Create Project dialog box to search for the project. Use semicolons to separate keywords. | All projects |
| <DocumentationPath> | Specifies the path to the HTML file you create to provide help for the project. If you use this tag, the project displays a More Information link after the description, which links to the HTML document. | Simple State Machine |
| <CustomVIMode> | Determines when to run a custom VI during the project creation process. Select from the following values: None—No custom VI runs. If you omit the <CustomVIMode> tag, None is the default value. AfterPage1—After the user selects a project, the Create Project dialog box closes, and the custom VI runs. AfterPage2NoUI—After the second page of the Create Project dialog box creates the project, the custom VI runs and completes. Then, the Create Project dialog box closes. AfterPage2WithUI—After the Create Project dialog box creates the project, the Create Project dialog box closes, and the custom VI runs. The custom VI is responsible for showing or hiding its panel. | Simple State Machine, Blank VI, Actor Framework |
| <CustomVIPath> | Specifies the path to the custom VI you want to run during the project creation process. If you set the <CustomVIMode> tag to None, LabVIEW ignores the <CustomVIPath> tag. Note: For the Create Project dialog box to call the custom VI, you must match the connector pane of the custom VI to the connector pane of the PostCopyScripting.vi in the labview/ProjectTemplates/Source/Core/Actor Framework/scripting/TwoTasksMetaDataObj directory. | Actor Framework |
| <SortPriority> | Determines the order of the project in the project list of the Create Project dialog box. The value of this tag is an index number, so a value of 0 places the project at the top of the list. If multiple items have the same priority value, LabVIEW sorts them alphabetically. | All projects |
| <MetaDataClass> | Specifies the path to a class that defines custom behavior for the user interface of the second page of the Create Project dialog box. | Actor Framework |
| <HidePrefix> | Determines whether to hide the File Prefix control on the second page of the Create Project dialog box. The default value is FALSE. | Feedback Evaporative Cooler |
| <HideIconOverlay> | Determines whether to hide the icon overlay controls on the second page of the Create Project dialog box. The default value is FALSE. | Feedback Evaporative Cooler |
Deploying Instructions
Where should it get deployed to:
- Selecting a LabVIEW Directory to Store Custom Content
- LabVIEW searches for content to display in the Create Project dialog box in two locations. Select the location that best suits how you want to use the custom content:
- <LabVIEW>\ProjectTemplates — Use this location if a managed code utility with version management, such as the VI Package Manager, installs the custom content.
- <LabVIEW Data>\ProjectTemplates — Use this location if you do not have write access to the <LabVIEW> directory, or if you want to single-source the custom content for multiple LabVIEW versions.
- Note
- LabVIEW performs a version check on all templates and sample projects in the <LabVIEW Data>\ProjectTemplates directory. If the .lvproj file for a project is saved in a later version of LabVIEW than the version currently running, the project is omitted from the Create Project dialog box.
Organizing the <LabVIEW Data> Directory
When you add templates and sample projects to the <LabVIEW Data> directory for the first time, you must create subdirectories to ensure that LabVIEW can find the content.
- Complete the following steps to organize the <LabVIEW Data> directory
- Create the ProjectTemplates directory under <LabVIEW Data>.
- Match the file hierarchy of the <LabVIEW>\ProjectTemplates directory such that the following paths exist:
- <LabVIEW Data>\ProjectTemplates\CategoryOverrides
- <LabVIEW Data>\ProjectTemplates\MetaData
- <LabVIEW Data>\ProjectTemplates\Source
Storing Source Files
Source files consist of the .lvproj file, libraries, VIs, and support files, such as images and documentation, for each custom template and sample project.
- Create a subdirectory in the ProjectTemplates\Source directory for each project you want to display in the Create Project dialog box and add the source files for each project to their respective subdirectories. Ensure that no subdirectory contains source files for multiple projects.
- Notes
-
- Ensure that your custom templates and sample projects do not contain any auto-populating folders.
- Ensure that your custom templates and sample projects do not contain any source VIs that are password-protected.
- Make sure that all the files referenced in your source .lvproj are included in their respective subdirectories. Missing project files can cause problems when developers attempt to use the Create Project dialog box to create an instance of your template or sample project.
Storing Meta Data
Metadata defines the content that appears in the Create Project dialog box. LabVIEW recognizes metadata in XML format. An XML file can contain metadata for one or more projects.
Store the XML file in the ProjectTemplates\MetaData directory.
Further Customization of the Create Project Dialog
Overriding the Sorting Order for Filters
The left pane of the first page of the Create Project dialog box lists all the filters you specify in the metadata XML file(s). By default, LabVIEW lists filters you create in alphabetical order.
- Complete the following steps to override the default sorting order for the filter list
- Create an XML file and add the <CategoryOverrides> tag. This tag encloses all category override data.
- Add a <Category> tag for each filter for which you want to specify custom sorting behavior. This tag encloses the name and sorting priority of each filter.
- For each filter, create a <Name> tag and set the value to the name of the filter you used in the meta data XML file.
- For each filter, create a <Priority> tag and set the value according to the behavior you want.
- The value of this tag is an index number, so a value of 0 places the filter at the top of the list. Any parent filter for which you specify a value less than 100 appears above the default parent filters, such as Templates and Sample Projects. If you specify a value for any child filter, the filter appears above the default child filters, such as Desktop.
- Store the XML file in the ProjectTemplates\CategoryOverrides directory.