Code Capture Tool: Difference between revisions
mNo edit summary |
No edit summary |
||
| Line 88: | Line 88: | ||
| Everything on the block diagram | | Everything on the block diagram | ||
|} | |} | ||
==== Snippet Creation<br> ==== | |||
The creation of a snippet can only be done when the '''Block Diagram''' is set to '''selected'''.<br> | |||
The header-text of the snippet is dynamically and has the following options:<br> | |||
{| class="wikitable" | |||
|- | |||
! scope="col" | Token<br> | |||
! scope="col" | Meaning<br> | |||
|- | |||
| $VERSION$<br> | |||
| Inserts the current [[Labview|LabVIEW]] version<br> | |||
|- | |||
| $NAME$<br> | |||
| Name of the captured VI, retrieved from the VI.VI Name property<br> | |||
|- | |||
| $TITLE$<br> | |||
| Title of the front panel of the captured VI<br> | |||
|- | |||
| $IMAGENAME$<br> | |||
| Name of image on disk without the PNG extension<br> | |||
|- | |||
| $DATE:xxx$<br> | |||
| Date/Time formatter, <tt>xxx</tt> must be replaced by a valid [http://zone.ni.com/reference/en-XX/help/371361F-01/glang/codes_for_time_format_str/ timestring formatter]<br> | |||
|} | |||
Per default the header string is <tt>LV: $VERSION$ $DATE:%c$</tt><br> | |||
<br> | |||
=== Clipboard settings === | === Clipboard settings === | ||
Revision as of 21:44, 3 December 2009
Introduction
The Code Capture Tool (or CCT) is a LabVIEW development tool targeted at LabVIEW users to capture images of their code and make it easier to share those images in online forums.
The CCT is based on an idea and earlier versions originally released by Chilly Charly on the NI Forums as starware.
Later, it evolved to a multiple OS and LabVIEW versions tool for creating code-shots and documentation shots.
A collaboration between Yair Neeman and Ton Plomp resulted in the 1.0 version of the CCT that is currently available through the LAVA CR at this site.
Instruction
A series of videos is available at Screencast.
A short how to is in the here available
An extensive discussion and demo of the CCT is here.
Version 2.0 introduces a new option to create annotations with text and graphics and the possibility to create snippets. There is a demo-video available at Screencast.
Download
Click here to download the file.
Interface
The CCT offers two interfaces to make and distribute images of LabVIEW code - a user interface and an API.
GUI
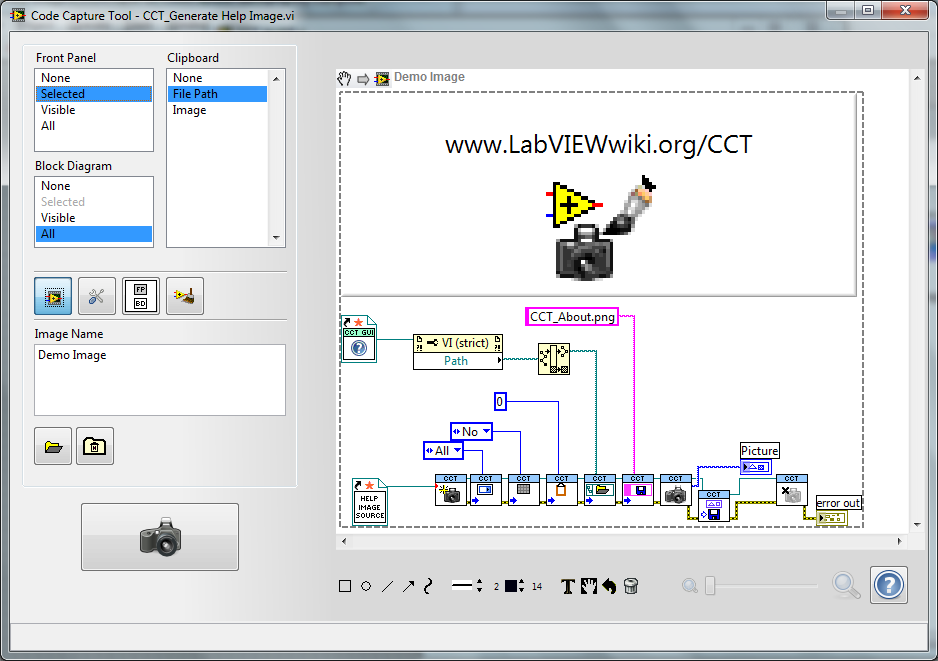
The user interface of the CCT allows the user to select which parts of a Front Panel or Block Diagram should be captured. The resulting image will be stored on disc and optionally the image or the path can be copied to the OS clipboard.

Front panel settings
The Front Panel listbox supplies the following options:
| Listbox | Item | Captured parts |
|---|---|---|

|
None | Nothing |
| Selected | All selected parts and items in between | |
| Visible | Everything visible in the current panel view | |
| All | Everything on the front panel |
Block diagram settings
The Block Diagram listbox supplies the following options:
| Listbox | Item | Captured parts |
|---|---|---|

|
None | Nothing |
| Selected | All selected parts and items in between | |
| Visible | Everything visible in the current block diagram view | |
| All | Everything on the block diagram |
Snippet Creation
The creation of a snippet can only be done when the Block Diagram is set to selected.
The header-text of the snippet is dynamically and has the following options:
| Token |
Meaning |
|---|---|
| $VERSION$ |
Inserts the current LabVIEW version |
| $NAME$ |
Name of the captured VI, retrieved from the VI.VI Name property |
| $TITLE$ |
Title of the front panel of the captured VI |
| $IMAGENAME$ |
Name of image on disk without the PNG extension |
| $DATE:xxx$ |
Date/Time formatter, <tt>xxx</tt> must be replaced by a valid timestring formatter |
Per default the header string is <tt>LV: $VERSION$ $DATE:%c$</tt>
Clipboard settings
The clipboard listbox supplies the following options:
| Listbox | Item | Copied item | Remarks |
|---|---|---|---|

|
None | Nothing | |
| Path | Path of the captured image | ||
| Image | The captured image | Only on Windows |
Layout settings
The Layout picture ring supplies the following layout options:
File settings
The file settings consists of two controls, the string control to name the file (a .png extension is added to the name automatically) and a browse button to set the folder where the file should be stored. To detect which folder is currently used hover over one of the two controls and the tip-strip will show the folder.
Resetting the folder
By default the storage folder is the LabVIEW temp folder (which by default is the same as the OS temp folder), and can be changed with the browse for folder button. To revert to the temp folder use this button ![]() .
.
Zoom function
The zoom slider allows the user to zoom in and out on the captured image and inspect it in detail. This only affects the preview image and will not change the stored image.
Annotation/Sketch toolbars
The annotation/sketch toolbars are used to add annotations and sketches/drawings to the capture.
Drawing tools
Drawing Styles
 The style of the line can be one of 5 styles:
- Continious
- Dash
- Dot
- Dash-Dot
- Dash-Dot-Dot
Line width
The linewidth of the sketch/drawing line can be alterd as well ![]()
Line/Text color
It's possible to alter the color of the annotation (sketch or text), when editing text changing the line coler takes effect immediatly.
Text size
The font of the annotation text cannot be altered and is fixed on Arial , the size however can be altered easily.
Editing tools
Help
The help button  calls the about window of the CCT including a short description of the main functions, a link to the webpage, a list of know issues and licensing info.
Capture
The capture button  will capture the image, save it, copy to the clipboard, save the currently selected options for the next time and close the window. This can also be done by pressing Enter.
Clean up
The clean up button  will clean up the whole BD (if 'whole' is set as BD option) or the current selection (if 'Selections' is set as BD option). This button is only visible if this option is active (correct LabVIEW version).
The CCT has several key shortcuts for easier access:
| Key | Function |
|---|---|
| Enter | Applies the current settings and does a capture or finishes a current text edit |
| F1 | Loads the about window centered on the help tab |
| F5 | Refreshes the current image |
| Escape | Closes the CCT without performing a capture or finishes a current text/graph edit |
API
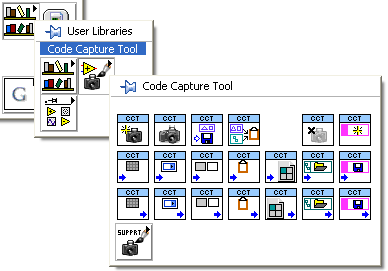
The API provides an interface to the various functions of the CCT. Its palette is accessible under User.lib\Code Capture Tool. 
| Methods | <linkedimage>
img_src=Image:CCT_GetSessions.png wikipage=Code_Capture_Tool#Create_CCT_Instance </linkedimage> |
<linkedimage>
img_src=Image:CCT_Capture_icon.png wikipage=Code_Capture_Tool#Capture_Image </linkedimage> |
<linkedimage>
img_src=Image:CCT_SaveImage.png wikipage=Code_Capture_Tool#Save_Image </linkedimage> |
<linkedimage>
img_src=Image:CCT_CopyToClipboard.png wikipage=Code_Capture_Tool#Copy_to_Clipboard </linkedimage> |
<linkedimage>
img_src=Image:CCT_CloseSession.png wikipage=Code_Capture_Tool#Destroy_CCT_Instance </linkedimage> |
<linkedimage>
img_src=Image:CCT_GenerateFileName.png wikipage=Code_Capture_Tool#Generate_File_Name </linkedimage> | |
|---|---|---|---|---|---|---|---|
| Set properties | <linkedimage>
img_src=Image:CCT_SetFP.png wikipage=Code_Capture_Tool#Set_Front_Panel_Mode </linkedimage> |
<linkedimage>
img_src=Image:CCT_SetBD.png wikipage=Code_Capture_Tool#Set_Block_Diagram_Mode </linkedimage> |
<linkedimage>
img_src=Image:CCT_SetLayout.png wikipage=Code_Capture_Tool#Set_Layout_Mode </linkedimage> |
<linkedimage>
img_src=Image:CCT_SetClipboard.png wikipage=Code_Capture_Tool#Set_Clipboard_Mode </linkedimage> |
<linkedimage>
img_src=Image:CCT_SetVI.png wikipage=Code_Capture_Tool#Set_VI_Ref </linkedimage> |
<linkedimage>
img_src=Image:CCT_SetFolder.png wikipage=Code_Capture_Tool#Set_Folder </linkedimage> |
<linkedimage>
img_src=Image:CCT_SetFileName.png wikipage=Code_Capture_Tool#Set_Filename </linkedimage> |
| Get properties | <linkedimage>
img_src=Image:CCT_GetFP.png wikipage=Code_Capture_Tool#Get_Front_Panel_Mode </linkedimage> |
<linkedimage>
img_src=Image:CCT_GetBD.png wikipage=Code_Capture_Tool#Get_Block_Diagram_Mode </linkedimage> |
<linkedimage>
img_src=Image:CCT_GetLayout.png wikipage=Code_Capture_Tool#Get_Layout_Mode </linkedimage> |
<linkedimage>
img_src=Image:CCT_GetClipboard.png wikipage=Code_Capture_Tool#Get_Clipboard_Mode </linkedimage> |
<linkedimage>
img_src=Image:CCT_GetVI.png wikipage=Code_Capture_Tool#Get_VI_Ref </linkedimage> |
<linkedimage>
img_src=Image:CCT_GetFolder.png wikipage=Code_Capture_Tool#Get_Folder </linkedimage> |
<linkedimage>
img_src=Image:CCT_GetFileName.png wikipage=Code_Capture_Tool#Get_Filename </linkedimage> |
| Support | <linkedimage>
img_src=Image:CCT_Support.png wikipage=Code_Capture_Tool#Support </linkedimage> |
<linkedimage>
img_src=Image:CCT_CaptureFP.png wikipage=Code_Capture_Tool#Capture_Front_panel </linkedimage> |
<linkedimage>
img_src=Image:CCT_CaptureBD.png wikipage=Code_Capture_Tool#Capture_Block_diagram </linkedimage> |
<linkedimage>
img_src=Image:CCT_ShowGUI.png wikipage=Code_Capture_Tool#Show_CCT_GUI </linkedimage> |
<linkedimage>
img_src=Image:CCT_70Container.png wikipage=Code_Capture_Tool#7.0_container_VI </linkedimage> |
<linkedimage>
img_src=Image:CCT_80_Container.png wikipage=Code_Capture_Tool#8.0_container_VI </linkedimage> |
Methods
| Methods | <linkedimage>
img_src=Image:CCT_GetSessions.png wikipage=Code_Capture_Tool#Create_CCT_Instance </linkedimage> |
<linkedimage>
img_src=Image:CCT_Capture_icon.png wikipage=Code_Capture_Tool#Capture_Image </linkedimage> |
<linkedimage>
img_src=Image:CCT_SaveImage.png wikipage=Code_Capture_Tool#Save_Image </linkedimage> |
<linkedimage>
img_src=Image:CCT_CopyToClipboard.png wikipage=Code_Capture_Tool#Copy_to_Clipboard </linkedimage> |
<linkedimage>
img_src=Image:CCT_CloseSession.png wikipage=Code_Capture_Tool#Destroy_CCT_Instance </linkedimage> |
<linkedimage>
img_src=Image:CCT_GenerateFileName.png wikipage=Code_Capture_Tool#Generate_File_Name </linkedimage> |
|---|
These VIs are used to activate methods for the CCT.
Create CCT Instance
This VI must be called for every instance of the CCT, it creates a GOOP dataspace that will contain the data of the instance. Calling this VI must be done with a valid VI reference.
Capture Image
This VI will apply the current settings and store the captured image in the CCT instance, additionally it returns the image itself.
Save Image
This VI will save the image to the path specified by a folder and filename stored in the CCT instance.
Copy to Clipboard
This VI will store the data specified by the clipboard settings to the clipboard.
Destroy CCT Instance
This VI must be called to close the CCT Instance and will free up used memory resources.
Generate File Name
This VI will generate a default filename based on the captured parts and VI name. This filename will not be stored inside the CCT session.
Set properties
| Set properties | <linkedimage>
img_src=Image:CCT_SetFP.png wikipage=Code_Capture_Tool#Set_Front_Panel_Mode </linkedimage> |
<linkedimage>
img_src=Image:CCT_SetBD.png wikipage=Code_Capture_Tool#Set_Block_Diagram_Mode </linkedimage> |
<linkedimage>
img_src=Image:CCT_SetLayout.png wikipage=Code_Capture_Tool#Set_Layout_Mode </linkedimage> |
<linkedimage>
img_src=Image:CCT_SetClipboard.png wikipage=Code_Capture_Tool#Set_Clipboard_Mode </linkedimage> |
<linkedimage>
img_src=Image:CCT_SetVI.png wikipage=Code_Capture_Tool#Set_VI_Ref </linkedimage> |
<linkedimage>
img_src=Image:CCT_SetFolder.png wikipage=Code_Capture_Tool#Set_Folder </linkedimage> |
<linkedimage>
img_src=Image:CCT_SetFileName.png wikipage=Code_Capture_Tool#Set_Filename </linkedimage> |
|---|
These VIs are used to change properties for the CCT instance.
Set Front Panel Mode
This VI will change the current front panel capture mode.
Set Block Diagram Mode
This VI will change the current block diagram capture mode.
Set Layout Mode
This VI will change the current layout orientation.
Set Clipboard Mode
This VI will change the current clipboard mode.
Set VI Ref
This VI sets the reference of the VI that needs to be captured
Set Folder
This VI will change the folder where the images will be saved.
Set Filename
This VI will change the filename of the stored image.
Get properties
| Get properties | <linkedimage>
img_src=Image:CCT_GetFP.png wikipage=Code_Capture_Tool#Get_Front_Panel_Mode </linkedimage> |
<linkedimage>
img_src=Image:CCT_GetBD.png wikipage=Code_Capture_Tool#Get_Block_Diagram_Mode </linkedimage> |
<linkedimage>
img_src=Image:CCT_GetLayout.png wikipage=Code_Capture_Tool#Get_Layout_Mode </linkedimage> |
<linkedimage>
img_src=Image:CCT_GetClipboard.png wikipage=Code_Capture_Tool#Get_Clipboard_Mode </linkedimage> |
<linkedimage>
img_src=Image:CCT_GetVI.png wikipage=Code_Capture_Tool#Get_VI_Ref </linkedimage> |
<linkedimage>
img_src=Image:CCT_GetFolder.png wikipage=Code_Capture_Tool#Get_Folder </linkedimage> |
<linkedimage>
img_src=Image:CCT_GetFileName.png wikipage=Code_Capture_Tool#Get_Filename </linkedimage> |
|---|
These VIs are used to retrieve properties from the CCT instance.
Get Front Panel Mode
This VI will read the current front panel capture mode.
Get Block Diagram Mode
This VI will read the current block diagram capture mode.
Get Layout Mode
This VI will read the current layout orientation.
Get Clipboard Mode
This VI will read the current clipboard mode.
Get VI Ref
This VI returns a reference to the that is currently captured in this isntance
Get Folder
This VI will read the folder where the images will be saved.
Get Filename
This VI will read the filename of the stored image.
Support
| Support | <linkedimage>
img_src=Image:CCT_CaptureFP.png wikipage=Code_Capture_Tool#Capture_Front_panel </linkedimage> |
<linkedimage>
img_src=Image:CCT_CaptureBD.png wikipage=Code_Capture_Tool#Capture_Block_diagram </linkedimage> |
<linkedimage>
img_src=Image:CCT_ShowGUI.png wikipage=Code_Capture_Tool#Show_CCT_GUI </linkedimage> |
<linkedimage>
img_src=Image:CCT_70Container.png wikipage=Code_Capture_Tool#7.0_container_VI </linkedimage> |
<linkedimage>
img_src=Image:CCT_80_Container.png wikipage=Code_Capture_Tool#8.0_container_VI </linkedimage> |
|---|
This submenu shows additional low level functions of the CCT.
Capture Front panel
Use this VI to have direct access to the capturing of a front panel.
Capture Block diagram
Use this VI to have direct access to the capturing of a block diagram.
Show CCT GUI
Use this VI to show the user interface of the CCT.
7.0 container VI
Use this VI if you want to build a source distribution or an executable and need to make sure all dynamic VIs are included. For LabVIEW 7.0 and up.
8.0 container VI (deprecated in version 2.0)
Use this VI if you want to build a source distribution or an executable and need to make sure all dynamic VIs are included. For LabVIEW 8.0 and up, don't forget to include the 7.0 container.
Version 2.0 of the Code Capture Tool installer will automatically select the correct container VI, so an additional 8.x container isn't needed anymore.
Known issues
| Description | Status |
|---|---|
| After using a non-default path and resetting it to the default, the new setting (temp) is not used | Solved in version 1.0 |
| Installing on Linux fails due to case sensitivity | Solved in version 1.0 |
| Capturing a non-visible part on a multi-pane front panel fails | A limitation due to the LabVIEW implementation of panes, most-likely not fixable |
| Saving an empty image returns an error | Solved in version 1.0 |
| Opening the CCT from the Getting Started Window locks up LabVIEW | Solved in version 1.0 |
| Possible High use of memory | Investigating |
| Impossible to capture FP of locked VI | Investigating |
Version History
Version 2.0.5
Release date 28 November 2009
- Bugfix release for bug 2905411.
Version 2.0.0
Release date 24 November 2009
- Support for VI snippet creation
- Support for adding comments and drawings
Version 1.0.0
Release date 27 February 2008
- Bug-fixes
- Support for panning of the preview
Version 0.9.1
Release date 7 November 2007
- Support for LabVIEW 7.x and up
- Support for all OS'es
- Support for orientation
- Support for selection
- Support for customized naming
- Support for customized folder
Licensing
The CCT is licensed under the BSD license


