Control References
Background
Until the release of LabVIEW 6i, there was no way of encapsulating the user interface portion of code when doing user interface programming. In previous versions of LabVIEW, user interface programming was done by using attribute nodes. Attribute nodes have implicit links to front panel controls and must reside in the block diagram of the same VI as their associated control. Therefore, if you have a VI that manipulates front panel controls extensively, your block diagram will end up with dozens of attribute nodes taking up a lot of space on the block diagram, making the block diagram cluttered and difficult to read. One of the keys to creating good LabVIEW applications is using the hierarchical nature of the VI. Creating modular programs using subVIs makes applications easy to debug, understand, and maintain. Until the release of LabVIEW 6i, there was no way to apply this same modular approach for user interface programming. The introduction of control references alleviates this problem.
Benefits
Control references have many benefits. They allow:
- Decoupling the front panel from the diagram.
- Moving complex UI code into sub-vi’s.
- Creation of truly reusable generic subVIs
Basic Usage
There are two types of control references, constants and controls.
Constant
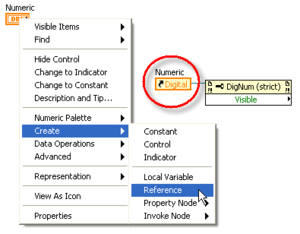
- Right-click a control or terminal and select Create»Reference
- Creates a control reference constant
- Its class is always strict
- Its value is always the same
- You do not have to close the reference. Multiple control reference constants for the same control return the same reference.
- Always strictly typed
To create a control reference constant for a control, right-click the control and select Create»Reference. A constant with a curved arrow appears on the block diagram. If you have multiple control reference constants for the same control, they all return the same reference. References returned from control reference constants do not need to be closed by the Close LabVIEW Object Reference function. A reference returned from a control reference constant is always strict.
Control
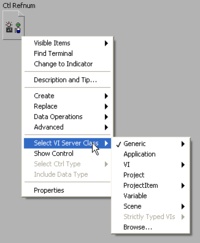
- Use it to pass references into subVIs
- Its default value is always invalid
- Located on the Controls»Refnum palette
- Specify its class by right-clicking it or dragging a control onto it.
Implicit vs. Explicit Linked
- Property nodes are implicitly linked to the front panel control from which they are created
- Property nodes are explicitly linked to the control they reference by connecting a control refnum wire
Use a property node with an implicit refnum input to set or read a control's attributes in the block diagram of the same VI. The property node is implicitly linked to the front panel control from which you created the property node, in that the information pointing the node to its corresponding front panel control is contained implicitly within the node. An implicitly linked property node is drawn differently from the normal property node, as it does not have a refnum input and output. The referenced control's name will be shown in the property node's label.
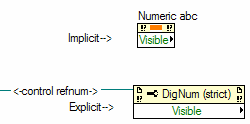
Control References are called explicitly linked because the Control Refnum Control in the subVI is explicitly wired to the Control Refnum Constant in the main VI, which tells it what control in the main VI that it is linked to.
Class Hierarchy Shortcut Menu
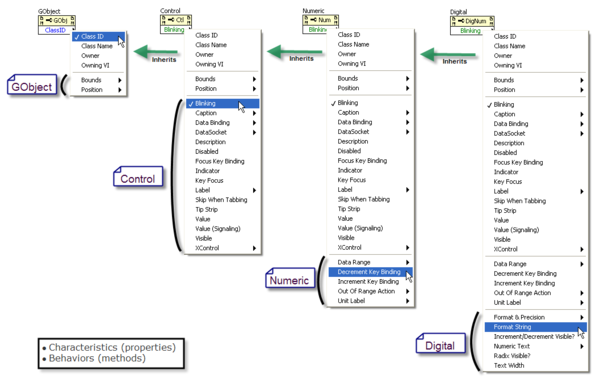
Selecting a more generic class for a control refnum will allow it to accept a wider range of objects. The top entry in each of the sub-menus above includes all of the entries beneath it. For example, selecting GObject will make that control refnum able to accept references from decorations, scales, controls, and panels. This could be a beneficial practice if we want to perform the same, general operation on multiple objects. All controls have the attribute "Visible". Therefore, if we wanted to be able to selectively turn on and off the visibility of our front panel controls, we could have one subVI to do this. This is because we would set the refnum control in that subVI to be of type "Control", so that it would accept all types of controls that we may have.
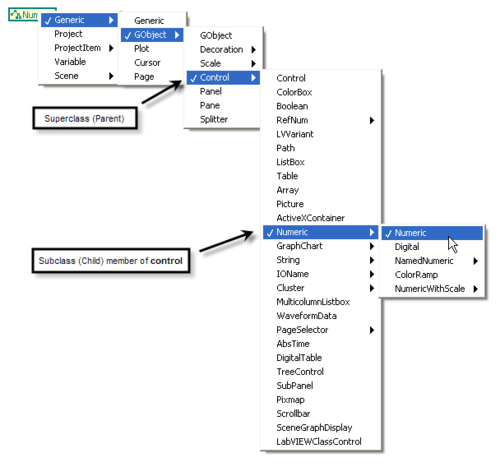
A class inherits properties and methods from its parent. For example, if you use the operating tool to click the Property Node configured for the Digital class, a shortcut menu appears listing all the properties that are available for the Digital class. The Digital class inherits from the Numeric class, which inherits from the Control class, which inherits from the GObject class, which inherits from the Generic class. In the property shortcut menu, properties are organized according to this hierarchy.
Non-Strict (weak) and Strict Classes
- Non-strict classes must treat value generically
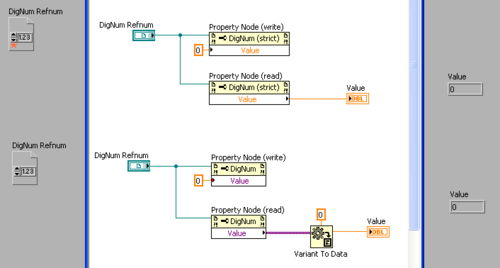
- Data type of Value property is variant
- Strict classes know exact data type of value
- Some classes always have known type of value
- Examples: String, Path, and so on
Allowing the user to choose refnums to be weakly or strictly typed gives them more freedom in programming. A weakly typed refnum is one that does not contain information about the type of data that the refnum points to. Conversely, a strictly typed refnum does contain the data type for the object that it points to. You can change between weak and strict refnums by right clicking on the refnum (or its terminal in the block diagram) and selecting "Include Data Type" for strict and deselecting it for a weak typed refnum. A red star on the Control Reference Control designates that the refnum is strictly typed. There are different cases for when you may want to use a strict type refnum over a weak typed refnum and vice versa.
A control refnum terminal that is strictly typed can only accept control references that are strictly typed to a compatible type. For example, if a subVI expects a control refnum of type Slide(Int32), you can wire a control reference of type Slide(Int32), Slide(Int8), or Slide(DBL), but not Slide(Cluster of DBLs). Wiring in the Slide(Int8) or Slide(DBL) will result in type coercion (no error) and thus a coercion dot as these representations are being coerced to Int32. Wiring the Slide(Cluster of DBLs) will result in a type conflict (error) and thus a broken wire. This is because the Int8 and DBL are numerics like the Int32 and can thus be coerced to be of Int32 representation. The Cluster of DBLs however, is not a numeric, but a totally different data type. Therefore, a cluster being of different data type than the numeric will result in a type conflict if wired together. Strictly typed references are most beneficial when you know exactly what type of data you will be using.
A control refnum terminal that is weakly typed does not care about the data type information of the input control refnum. If a subVI expects a control reference of type Slide(any data type) because it is weakly typed, you can wire a control refnum of type Slide(Int32), Slide(cluster of DBLs), etc. In this case, as long as the control is of the class Slide, it will be accepted by the weakly typed control refnum no matter what data type the Slide is. Thus, to create a subVI that operates on any slide, the user should use a weakly typed control refnum. If the user wants to access the slide's data in the subVI as the exact data type, he needs to use a strictly typed control refnum. Using weakly typed references can be beneficial when you want to allow a wide range of data types for a given control. It provides versatility of code as a subVI with a weakly typed control reference could be used multiple times on Slides (in this case) with varying data type.
Using the “Value” Property
- Use it to set or read from anywhere
- Every control can be a global variable
- Slower than writing a terminal or local variable
- Recommendation: use only when necessary
The Control class has the Value property. You can use it to read and write a control value just like local variables. The Value property was created so that the value of a control can be updated at the same time when we change the control attributes. In LabVIEW 6.0, writing to the Value property is much slower than writing to a local variable. Every time you write to the Value property, it updates the control, even if the value has not changed. (When you are writing to the Value property in a fast loop, you should probably check whether the value has changed before writing to the Value property.) When you create a subVI from a selection that contains a local variable, the local variable turns into a property node with the Value property.
Using a “Reference” Property
- Some properties return a reference to sub-objects
- “Owner,” “Label,” “Caption,” and so on.
- They are always read only
- Property always allocates a new reference
- You should close references explicitly
- LabVIEW closes them when VI goes idle but they accumulate until then
- Use Dotted notation instead, if possible
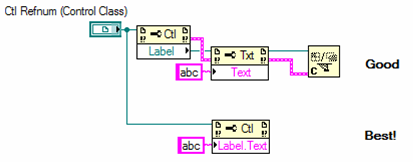
There are some properties that return a reference to other objects. They include the Owner property of the Generic class, Label and Caption properties of the Control class, Controls, Decorations, and All Objects properties of the Panel class, Xscale, Yscale of the Graph/Chart class, Plot properties of the Chart class, and so on. These reference properties are read only. Reading a reference property creates a new reference each time, so the reference should be closed, especially in a loop.
A reference property can be dotted in one Property Node. For example, you can have Label.Text property. It is equivalent to getting a reference to a control label and wiring that to another Property Node to get the label’s text. The only difference is that with the dotted property, LabVIEW does not allocate a reference to label.
Type Casting to Another Class
- Downcast with the To More Specific Class function or upcast with the To More Generic Class function
- Use it with properties that return generic types
- Returns error at run time if the casting is not valid
- Use it to find out the type dynamically.
- use the Class Name property (very powerful)
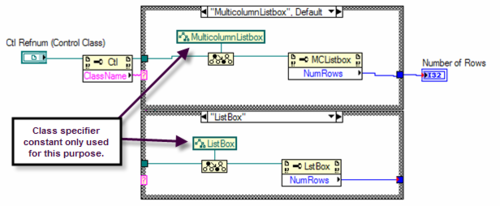
There are two functions in LabVIEW that manipulate references. To More Specific Class is used to downcast a reference, for example, from a Control reference to a Numeric reference. Because LabVIEW cannot tell this type of casting is valid at compile time, this function returns an error if casting is invalid at run time. Use the To More Generic Class to type cast a reference to a more generic class, for example, from a Digital reference to Control reference. (This function does not return an error if casting is invalid, because the validity of casting can be checked at compile time.) Note: You cannot use To More Specific Class to cast a generic VI reference to a strict VI reference.
Automatic Upcasting
- LabVIEW does it when necessary
- Casts up to closest common ancestor
- Happens at Build Array, select structure output tunnels, subVI inputs, and so on.

References are automatically upcast at Build Array and Case structure tunnels. For example, if you build an array of references from a reference to a numeric, a reference to a string, and a reference to a multicolumn listbox, the references are upcast to the Control class, which is the common parent class for all these classes.
“Front Panel.Controls []” Property
- Allows manipulation of controls and data on any VI panel
- Control references must be closed

