
Style Guide: Difference between revisions
No edit summary |
m →Organization and Names of Files: Wikify |
||
| (27 intermediate revisions by 4 users not shown) | |||
| Line 6: | Line 6: | ||
The following guidance is applicable to all the items and artifacts that are contained within a LabVIEW Project, including VIs and containers such as Projects, Libraries, and Classes. | The following guidance is applicable to all the items and artifacts that are contained within a LabVIEW Project, including VIs and containers such as Projects, Libraries, and Classes. | ||
;Organize all files logically | |||
:You should organize directories and files so that someone with a reasonable skill level is able to navigate the directory structure. | |||
: | |||
:If you are consistently working on similar projects, you may want to come up with standards for your projects. The authors of this Guide have seen several different and reasonable directory organizations that were appropriate for different projects, which is why this Guide isn't detailed on this topic. | |||
== Naming Files and Directories == | |||
;Choose names so they are easy to read and describe the purpose of the file or directory | |||
: | |||
:* Use names that describe the purpose of the file or directory. | |||
:* Use full words except where an abbreviation is well known by the intended audience, such as "USB Port" for "Universal Serial Bus Port". | |||
:* Use [[wikipedia:title case|title case]] with single space characters between words. | |||
:* You may use dashes in situations where dashes are ordinarily used, such as for “Real-Time”. | |||
:* Make sure those names work in all relevant platforms. | |||
: | |||
:'''Details:''' | |||
:Refer to [[#Appendix A: Book Title Case|Appendix A: Book Title Case]] for definitions and examples. | |||
;Windows file path length limitation | |||
:When coming up with file and directory names, keep in mind the Windows file path length limitation of 260 characters. | |||
;Avoid special characters in file names | |||
: For greatest cross-platform compatibility and to simplify reading of file names, avoid the use of special characters in file names such as: | |||
: | |||
:* File separators like <code>:</code> (colon) <code>/</code> (forward-slash) <code>\</code> (backward-slash). | |||
:* Symbols like <code>¢™$®</code>. | |||
:* Punctuation marks, parentheses, quotation marks, brackets, and operators like <code>. , [ ] { } ( ) ! ; " ' * ? < > |</code>. | |||
:* White space characters such as tabs, new lines, and embedded returns. Note: Spaces are acceptable for most applications. | |||
;Do not use camel-case, Pascal-case, or underscore characters for separation of adjacent words | |||
:''Bad:'' | |||
:* <code>GRTC.lvproject</code> | |||
:* <code>GenRTCntrl.lvproj</code> | |||
: | |||
:''Good:'' | |||
:* <code>GenericRealTimeControl.lvproj</code> | |||
:* <code>Generic Real-Time Control.lvproj</code> | |||
:* <code>ExitAllOnErr.vi</code> | |||
:* <code>Exit All on Error.vi</code> | |||
;Use names of control VIs as labels | |||
:Use names of control VIs as labels for corresponding controls. For example, use the label <code>alarm boolean</code> as the label in <code>Alarm Boolean.ctl</code>. | |||
;Name polymorphic VI instances | |||
:Name polymorphic VI instances by using space-dash-space between the poly VI name and the specific instance designation. For example, if the poly VI is called <code>Read My Special File.vi</code>, then an instance VI may be called <code>Read My Special File - I32.vi</code>. | |||
== | === File and Directory Names for Examples, Templates, and Sample Projects === | ||
This subsection applies to the examples, templates, and sample projects installed in relevant directories within the LabVIEW directory structure. | |||
;Do not include the word "example" in any file or folder names | |||
;Add a prefix to all example names when developing for a specific driver or addon | |||
:Use the form <code><Short Product Name><space><Example Name></code>. For example, <code>NI-DAQmx Voltage - Continuous Input.vi</code>. | |||
;Avoid deeply nested file folders | |||
:Ensure that none of your project’s file folders on disk are too deeply nested. If the user’s project contains a file with a path that exceeds 260 characters in length (for Windows), the project copy will fail. Aim for having a maximum path length of less than 150 characters so there is plenty of room to account for a user saving their project in a deeply-nested path. | |||
;Name your .lvproj file the same as the folder that contains it | |||
:For templates and sample projects, name your .lvproj file the same as the folder that contains it, e.g., the “PC USRP-RIO Streaming” template folder contains “PC USRP-RIO Streaming.lvproj”. | |||
== Project Organization == | |||
;Place the top-level VIs for the project directly under appropriate targets | |||
:Place the top-level VIs directly under the appropriate targets. Because you cannot mark a VI as a top-level VI, placing the top-level VIs under the corresponding target helps clarify which VIs are top-level. | |||
;Organize VIs in a hierarchical directory | |||
:Organize VIs in a hierarchical directory with easily accessible top-level VIs and subVIs in subdirectories. Limit the number and level of directories in a project. | |||
;Place all VIs in libraries, classes, or virtual folders | |||
:Avoid using [[auto-populating folder]]s unless you have a good reason to use them. | |||
''' | ;Remove all unused files | ||
: | |||
:''Details:'' | |||
:* Remove all unused files both from the applicable projects/libraries and from the disk. | |||
: | |||
:''Tip:'' | |||
:* Right-click the project root in the Project Explorer window and select ''Find Items with No Callers'' from the shortcut menu to display the [[Find Items with No Callers (dialog)|Find Items with No Callers]] dialog box. This dialog box identifies all the items you can remove. | |||
== Libraries == | |||
;Consider using virtual folders to delineate between public and private members of a library | |||
:([[VI Analyzer]]) Consider using virtual folders to delineate between public and private members of a library. | |||
;Place APIs in a library | |||
:Place APIs in a library to improve organization. | |||
;Mark non-API VIs as private | |||
:Mark any VIs in a library as private if they are not part of the API. | |||
== LabVIEW Classes == | |||
'' | ;Name all classes as nouns | ||
:''Example:'' | |||
:* Name an example class <code>Waveform Reader.lvclass</code> rather than <code>Reads Waveforms.lvclass</code>. | |||
'' | ;Name all member VIs of a LabVIEW class as verbs | ||
:''Example:'' | |||
:* Name an example member <code>VI Read Value.vi</code> rather than <code>Value.vi</code>. | |||
'' | ;Avoid including the name of the class in VI names | ||
:''Example:'' | |||
:* If we have a class <code>Circle</code> and it needs a VI to return the area, this VI should just be called <code>Calculate Area</code> as opposed to <code>Calculate Circle Area</code> or <code>Circle Calculate Area</code>. Note that LabVIEW provides a namespace for VIs in a library such that it is considered as <code>Circle.lvclass:Calculate Area.vi</code>. | |||
;Use "Read" for VIs that read data | |||
Use | :Use the word "Read" to begin the name of any VI that strictly reads data from the private data of a class. Avoid using the word "Get" or any synonym of "Get". | ||
;Use "Write" for VIs that bundle data into the private data | |||
:Use the word "Write" to begin the name of any VI that strictly bundles data into the private data of a class. Avoid using the word "Set" or any synonym of "Set". | |||
;Use Book Title Case for class virtual folders and VI names | |||
:Use Book Title Case for all class virtual folders and VI names. | |||
: | |||
:''Details:'' | |||
:* When auto-created by LabVIEW, the class property virtual folder name and the class property VI names may initially match the case of the control label in the class control. Since labels should follow the label guidelines listed in section [[#Control and Indicator Labels/Captions|Control and Indicator Labels/Captions]], you may need to change the class property virtual folder and VI names to be Book Title Case. | |||
:* The name of a class property virtual folder is used as the name in a class property node. | |||
:* Because this is auto-generated by LV and may be tedious to change, this guideline is a recommendation at this time. | |||
:* A LabVIEW Developer tool may be created that will correct the auto-generated virtual folder and VI names to match these guidelines. | |||
= Monitor Size, Window Size, and Window Placement = | |||
;Code should look good on a 1536 x 824 monitor | |||
: Write code so that it looks good on a monitor with 1536 x 824 pixels for most individual file windows, or the target monitor size if designing a UI front panel. | |||
: | |||
:''Details:'' | |||
:* If you have a computer running Windows 10, 1536 x 824 pixels corresponds to 1920 x 1080 pixel resolution with 125% scaling. These are often default settings on a 15" laptop. | |||
:* With properly configured [[LabVIEW.ini]] tokens you can use the [[Arrange VI Window]] Quick Drop (Ctrl-Space, Ctrl-F) to make sure your VI front panel and block diagram windows comply with this guideline. | |||
:* VIWin.DisplayWorkspaceRight=1536 | |||
:* VIWin.DisplayWorkspaceBottom=824 | |||
;Save files with minimal white space | |||
:Save files so all relevant content that can be shown is shown without showing a lot of extraneous white space. | |||
;Position window near the upper-left corner of the monitor | |||
:Save files so the upper left corner of the window is close to the upper left corner of the monitor. | |||
= | = VI Window Considerations = | ||
;Size the windows so the entire toolbar fits | |||
:([[VI Analyzer]]) Size the windows so the entire toolbar fits. | |||
: | |||
:''Tip:'' | |||
:* Use front panel cleanup to comply with this guideline for front panels. Use Arrange VI Window Quick Drop (Ctrl-Space, Ctrl-F) to comply with this guideline for block diagrams. | |||
'' | ;Size front panels and block diagram windows appropriately | ||
:Size the front panel and block diagram windows reasonably for the content and never full-screen. | |||
: | |||
:''Tip:'' | |||
:* Use Arrange VI Window Quick Drop (Ctrl-Space, Ctrl-F) to comply with this guideline. | |||
;Consider sizing panels with tall type definitions | |||
:If a front panel contains a tall type definition cluster, consider sizing the panel to fit existing regular controls and include part of the type definition. | |||
: | |||
:[[File:Items.png|frameless]] | |||
;Include wide type definition clusters in the panel | |||
:If a front panel contains a wide type definition cluster, consider including the cluster below the visible screen and a note indicating that the user can scroll down to see it. | |||
:[[File:Items wide.gif|frameless]] | |||
''Details:'' | ;Entire block diagram should fit on the monitor | ||
:The entire block diagram of a VI should fit on the monitor. | |||
: | |||
:''Details:'' | |||
:* If this guideline is impossible to comply with, write the block diagram so you can read it scrolling in only one direction. | |||
= VI, Library, and Class Interfaces = | |||
== | == Front Panel == | ||
;Set reasonable default values for controls | |||
:Set reasonable default values for controls. Use data type defaults for indicators. | |||
;Avoid overlapping labels and displays | |||
(VI Analyzer) | :([[VI Analyzer]]) Avoid overlapping the labels, digital displays, or other parts of controls and indicators. | ||
:* Allow for extra space between controls and indicators to account for font changes on different platforms, and for Windows scale and layout settings. | |||
:* Overlapped controls and indicators slow down screen updates and can make the control or indicator flicker. | |||
'' | ;Use path controls and indicators | ||
:Use path controls and indicators instead of string controls and indicators to specify the location of files or directories. | |||
: | |||
:''Rationale:'' | |||
:* Unlike strings, path controls format paths using the standard syntax for the platform you use. | |||
;Set appropriate browse options for path controls | |||
:When using path controls, set the browse options appropriately. For example, if a path control is intended for existing directories, select the Folders only and Existing only options on the Browse Options page of the Properties dialog box. | |||
== | == GUI VI Front Panels == | ||
'' | ''Note:'' | ||
In this context, a GUI is a VI front panel that is used as a visual part of a UX, for example the visual piece of a LabVIEW-built application or the visual piece of a plug-in to a framework. As a counter-example, VIs that are parts of APIs are not considered GUI VIs, even if they happen to go on palettes. | |||
- | |||
;Minimize the use of colors | |||
:Minimize the use of colors. Use colors logically and consistently. | |||
;Hide the toolbar | |||
:Hide the toolbar. | |||
;Use consistent control styles | |||
Use | :Use one consistent style for all controls. Use system controls when possible. | ||
;Customize appearance with strict type definitions | |||
Use | :Use custom controls or strict type definition controls to customize the appearance of a control. Use strict type definition controls only to preserve the exact appearance of a control in each location of use. | ||
;Use standard fonts | |||
Use | :([[VI Analyzer]]) Use the standard application, system, and dialog fonts for all user interfaces in the application. | ||
: | |||
:''Details:'' | |||
:* Use the standard font unless you have a specific reason to use a different font. For example, you can use monospace fonts because they are proportionally spaced for string controls and indicators that constrict character use. | |||
;Configure numeric inputs to coerce values | |||
:Configure numeric inputs to coerce values to the valid data range if applicable. | |||
;Arrange controls logically | |||
:Arrange controls from top left to bottom right. | |||
: | |||
:''Details:'' | |||
:* Place controls in the order of typical use. For top-level VIs visible to users, place the most important controls in the most prominent positions. | |||
;Organize UI elements with logical layout | |||
:Organize UI elements using proximity, alignment, decorations, and UI features such as tab controls and subpanels. | |||
''Details:'' | ;Configure the front panel to fit the monitor | ||
:Configure the front panel to fit the monitor resolution used in the application. | |||
: | |||
:''Details:'' | |||
:* Monitor resolution used in the deployed system may be different from monitors used for development. | |||
= | ;Use labels for controls and indicators | ||
:Use labels to describe the function of controls and indicators. Limit caption use to controls and indicators that require more information than the label conveys or when you need the ability to change the display text of a control programmatically. | |||
: | |||
:{| class="wikitable" | |||
|- | |||
! Situation | |||
! Example | |||
|- | |||
| If the control is visible to the user, use captions to display a long description and add a short label to prevent using valuable space on the block diagram. | |||
| When you label a ring or slide control with options for volts, ohms, or amperes, selecting a caption such as "select units for display" is more usable than the label V/O/A. Use Property Nodes to change captions programmatically. | |||
|- | |||
| If you use the VI with the control on multiple platforms, avoid using special characters in control names. | |||
| Use degree Celsius instead of °C because the ° symbol might not display correctly on all platforms. | |||
|} | |||
: | |||
:''Details:'' | |||
:* Use captions for descriptive text if the label is insufficient. | |||
;Set intuitive keyboard shortcuts | |||
:Set up intuitive keyboard shortcuts and tabbing order for controls. | |||
: | |||
:''Details:'' | |||
:* Some users prefer to use the keyboard instead of a mouse. Consider including keyboard shortcuts for VIs, even if the use of a mouse is available. Set the tabbing order for controls from left to right and top to bottom. Use the <Enter> key for the default control and the <Esc> key for the Cancel button. | |||
;Write descriptions and tip strips | |||
:Write descriptions and create tip strips for UI front panels and controls to describe the purpose of an object and give users instructions for using the object. | |||
== | == Dialog Front Panels == | ||
;Use system control style | |||
:([[VI Analyzer]]) Use the system control style when possible to ensure that dialogs look consistent with the operating system. | |||
;Do not use scroll bars on entire front panels | |||
:Do not show scroll bars on the entire front panel windows. Design the dialog box to display all information. Use scroll bars on individual controls and indicators as appropriate. | |||
: | |||
:''Tip:'' | |||
:* Set the VI Window Appearance to Dialog through File > VI Properties. | |||
;Provide meaningful window titles | |||
:Provide a meaningful window title that explains the purpose of the dialog. | |||
;Avoid default menus | |||
If | :If the dialog has menus, only use menus that are specific to the dialog window. Avoid using default menus. | ||
;Limit dialog box use | |||
:Limit dialog box use to critical user interactions. Avoid overusing dialogs. | |||
;Ensure dialogs are modal or floating | |||
:Make sure that all dialogs are either modal to the main application or floating. | |||
;Use the system panel background color | |||
:Use the system panel background color for dialog user interfaces to maintain consistency. | |||
;Center the dialog on the main monitor | |||
:Center the dialog on the main monitor. | |||
== Front | == Non-GUI VI Front Panels == | ||
;Use default colors for UI elements | |||
:([[VI Analyzer]]) Use the default colors for all UI elements of the front panel. | |||
;Arrange controls and indicators relative to connector pane terminals | |||
(VI Analyzer) | :([[VI Analyzer]]) Arrange controls and indicators relative to corresponding connector pane terminals. | ||
- | : | ||
- | :''Tip:'' | ||
:* Use [[Arrange VI Window]] Quick Drop (Ctrl-Space, Ctrl-F) to arrange the panel objects. | |||
;Group related data into clusters | |||
:Consider grouping related input and output data into clusters. Make the cluster a type definition. | |||
;Use Modern style controls | |||
:Use Modern style controls, except if you use a type definition from a dependency that isn’t a Modern style control. | |||
;Use buttons for Boolean controls and LEDs for Boolean indicators | |||
:Make sure controls look like controls and indicators look like indicators. For example, use buttons for Boolean controls and LEDs for Boolean indicators, except if you use a type definition. | |||
;Use labels, not captions, unless localization is required | |||
:Use control and indicator captions only if you need to localize non-GUI VIs. Otherwise, only use labels. | |||
== Control and Indicator Labels/Captions == | |||
;Choose descriptive names | |||
:Choose names so they are easy to read and describe the purpose of the control or indicator. | |||
: | |||
:* Create names that describe the purpose of the control or indicator. | |||
:* Use full words except where an abbreviation is well known by the intended audience, such as "USB Port" for "Universal Serial Bus Port". | |||
:* In GUI VIs, use Book Title Case. | |||
:* In non-GUI VIs, use all lowercase characters except for proper nouns and common uppercase abbreviations. | |||
:* Use single space characters between words. | |||
:* You may use dashes in situations where dashes are ordinarily used, such as for "Real-Time." | |||
:* Make sure those names work on all relevant platforms. | |||
: | |||
:''Details:'' | |||
:* Refer to [[#Appendix A: Book Title Case|Appendix A: Book Title Case]] for definition and examples. | |||
:* In this context, a GUI is a VI front panel that is used as a visual part of a UX, for example, the visual piece of a LabVIEW-built application or the visual piece of a plug-in to a framework. As a counter-example, VIs that are parts of APIs are not considered GUI VIs, even if they happen to go on palettes. | |||
;Avoid duplicate labels | |||
:([[VI Analyzer]]) Avoid using duplicate labels. | |||
;Add "in" and "out" to input/output pairs | |||
:If a VI contains an input and output pair, add a suffix of "in" to the control label and a suffix of "out" to the indicator label. For example, if a VI includes an input called object in, name the corresponding output object out. | |||
'' | ;Label error inputs and outputs as "error in" and "error out" | ||
:If a VI has an error input or an error output, label them as "error in" and "error out" exactly as shown, unless there is a specific reason not to. | |||
: | |||
:''Details:'' | |||
:* There is no value in including the default value ("no error") because you never want a different default value for the error input. | |||
'' | ;Use parenthesis in labels only for units | ||
:Use parenthesis in labels only to document units of a control or indicator when it makes sense to do so. | |||
: | |||
:''Details:'' | |||
:* Avoid using parenthesis for any other purposes. | |||
:* You should not include the default value in the label in parenthesis. | |||
''Details:'' | ;Use SI units | ||
:When including units in a label, use units approved and documented in The International System of Units. | |||
: | |||
:''Details:'' | |||
:* Refer to [[#Appendix B: International System of Units|Appendix B: International System of Units]] for a list of conventional units. | |||
'' | ;Use "Size to Text" for labels | ||
:Use Size to Text for labels so the text rectangle automatically resizes to accommodate the text you enter. By default, Size to Text is enabled for one line of text. | |||
: | |||
:''Details:'' | |||
:* The three standard fonts (application, system, and dialog) vary depending on the platform. For example, preferences and video driver settings in Windows affect the size of the fonts. Text may appear larger or smaller on different systems. To compensate for font variations, allow extra space for larger fonts and enable the Size to Text option via the label's shortcut menu. | |||
;Use the default Application font for labels | |||
:Use the default Application font with all default cosmetic settings unless you have a good reason not to. | |||
;Use transparent background color for labels | |||
:([[VI Analyzer]]) Use transparent background color for labels. | |||
== Free Labels on Front Panels == | |||
;Avoid the use of free labels on front panels | |||
:Avoid the use of free labels on front panels except where particularly useful. | |||
: | |||
:''Example Exceptions:'' | |||
:* VI Analyzer template front panels contain useful free labels instructing you what not to change about the controls and indicators. | |||
:* Certain globals used as constants contain useful free labels reminding you to save changes to control values as default values. | |||
:* Some example programs contain useful instructions on front panels. | |||
;Use carriage returns only to separate paragraphs | |||
:([[VI Analyzer]]) Use carriage returns in free labels only to separate paragraphs. | |||
;Use Size to Text for single-line labels | |||
:([[VI Analyzer]]) If a free label occupies a single line, use Size to Text. Size free labels with multiple lines so that all the text is visible and provide extra space at the bottom of a free label to account for font size changes across platforms. | |||
;Use the standard application font for free labels | |||
:Use the standard application font for free labels unless you have good reasons not to do so. | |||
== Classes and Property Nodes == | |||
;Support Property Node syntax for data accessors | |||
:Consider supporting the syntax of Property Nodes for data accessor VIs. However, accessors that use Property Node syntax require error terminals and take more time to execute than data accessor VIs without error terminals. Evaluate and choose appropriately for each class. | |||
== VI Description == | |||
;Describe what the VI does in the VI Description text box | |||
:For each VI intended to be used by others, such as API VIs and examples, describe what the VI does in the VI Description text box. | |||
== VI Connector Pane == | |||
;Use the 4x2x2x4 connector pane for all VIs | |||
:([[VI Analyzer]]) Use the default 4x2x2x4 connector pane for all VIs, which provides 12 terminals total. This pattern provides a balance of flexibility of terminal location and density of terminals. Connector panes with more terminals (such as 5x3x3x5) can be difficult to wire due to the smaller terminal size. If you find yourself needing to increase the number of terminals on your subVI beyond 12, your subVI may not be sufficiently modular, and may require a redesign. | |||
;Use left terminals for controls and right terminals for indicators | |||
:Use the left terminals for controls and right terminals for indicators. When using the top and bottom terminals, place all controls to the left of indicators. | |||
;Place related controls and indicators at the same relative position | |||
:Place related controls and indicators at the same relative position on the connector pane. For example, if you assign a data in control to the top left terminal, assign the corresponding data out indicator to the top right terminal. | |||
;Ensure consistency for similar controls across APIs | |||
If the | :If a control or indicator serves the same function throughout an API, name the control or indicator consistently and place it in the same position throughout all API connector panes. | ||
;Place paths, references, and classes in the top corners | |||
:([[VI Analyzer]]) Place paths, references, and LabVIEW Classes in the top corners. | |||
;Place error terminals at the bottom corners | |||
:([[VI Analyzer]]) Assign error in and error out terminals to the corresponding bottom left and right terminals. | |||
;Preserve empty terminals for future expansion | |||
:([[VI Analyzer]]) Preserve empty terminals on the connector pane to allow for future expansion. | |||
;Set required terminals for must-wire inputs | |||
:Configure input terminals for parameters that must be wired for the VI to function as Required. | |||
;Set recommended terminals for inputs with good defaults | |||
:Configure input terminals that have good default values as Recommended. If you are not sure whether an input should be required or not, make it Required. | |||
== VI, Library, and Class Icons == | |||
'' | ;Use glyphs for high-visibility VIs | ||
:Use glyphs in icons for VIs that will have high visibility, such as APIs for software products. Use text in icons otherwise. | |||
: | |||
:''Rationale:'' | |||
:* The effort required to create good glyph-based icons is rarely justified for VIs with limited audience. | |||
'' | ;Always create standard size (32x32 pixel) icons | ||
- | :Always create standard size (32x32 pixel) icons. | ||
: | |||
:''Exceptions:'' | |||
:* In very rare cases it may be appropriate to have a shorter icon. For example, if you use an enumeration with names of hardware registers, you may want to use a short icon for a commonly used register-name-to-register-address subVI to preserve block diagram space in subVI call locations. | |||
;Use glyphs from the Glyphs tab in the icon editor when applicable | |||
:Use glyphs from the Glyphs tab in the icon editor when applicable. | |||
;Avoid using colloquialisms in icons | |||
:Avoid using colloquialisms in icons because they may not work across cultures and languages. For example, avoid representing a data logging VI with a picture of a tree branch or a lumberjack. On the other hand, a pencil is generally understood as a utensil for writing. | |||
;Use standard text settings for icons | |||
:Use the following font settings for the text used in icons: | |||
:* Font: Small Fonts | |||
:* Alignment: Center | |||
:* Size: 9 | |||
:* Center text vertically: Checked | |||
:* Capitalize text: Checked | |||
:* Color: Black, with a possible exception for the library layer set forth below | |||
;Use text that matches all or part of the VI name | |||
Use | :Use text that matches all or part of the VI name in the icon. | ||
;Limit the text to three lines with a library or class banner | |||
:Limit the text to three lines if a library or class icon banner is included or to four lines otherwise. | |||
;For non-library VIs, use a plain transparent square with a single pixel black border | |||
:For VIs that are not part of a library or class, use a plain transparent square with a single pixel black border as the base layer for the icon. | |||
;For library or class VIs, use a library layer with a black border | |||
:For VIs that are part of a library or class, use a library layer and a plain transparent square with a single pixel black border as the base layers for the icon. | |||
'' | ;Use 32x9 pixel rectangles for library/class banners | ||
:Use 32x9 pixel rectangles with black frames for library and class library icons. Position those rectangles at the very top of the 32x32 pixels allocated for the icons. | |||
: | |||
:''Tip:'' | |||
:* Reduce the size of the default library and class icon by three vertical pixels. | |||
: | |||
:''Rationale:'' | |||
:* Taking into account a pixel for the bottom border, this leaves 22 vertical pixels for individual VI icons. If you are using text with the settings specified below, and you have three lines of text, 23 vertical pixels give you two pixels of vertical spacing between the top and text, two pixels of vertical spacing between the lines, and one pixel of vertical spacing between the last line and the bottom border, which makes the text for the individual icon look reasonably good. | |||
;Limit text in the banner to a single line | |||
:Limit text in the banner of the library and class icons to a single line. | |||
;Ensure contrast between front and background colors | |||
If | :If you put text in the library or class icon banner, make sure there is enough contrast between front and background colors so that you can easily read the text. | ||
:* If the library icon background color is light, use black color for the text. | |||
:* If the library icon background color is dark, use white color for the text. | |||
== LabVIEW Class Wires == | |||
''Details:'' | ;Avoid excessive wire patterns and colors | ||
:Avoid creating excessive wire patterns and colors if you change the wire appearance of a LabVIEW class wire. | |||
: | |||
:''Details:'' | |||
:* The number of colors and patterns in the block diagram window can affect the readability of LabVIEW code. Change the wire appearance of LabVIEW class wires only if necessary to differentiate between other class wires in the block diagram window. | |||
;Use dark colors on the exterior of class wires | |||
Use | :Use dark colors on the exterior of class wires to provide contrast against the white background. | ||
'' | ;Use refnum color for wires if the private data contains only refnum types | ||
:If the private data of a class contains only refnum types, use the standard refnum color for the class wire. Locate the color named "Refnum Wire" in the User Colors dialog box for the LabVIEW color picker. | |||
: | |||
:''Note:'' | |||
:* This guideline takes precedence over other wire color guidelines. | |||
;Match class wire color to the icon banner color | |||
:Make the color of the class wire match the color of the class icon banner. | |||
= Programming VI Block Diagrams = | |||
;Avoid duplicating code | |||
Use | :Avoid duplicating code. Use subVIs or loops, as appropriate, to avoid code duplication. | ||
;Remove unused code | |||
:([[VI Analyzer]]) Remove unused code from block diagrams. | |||
'' | ;Avoid race conditions with appropriate synchronization | ||
:Avoid race conditions by using appropriate synchronization techniques. | |||
: | |||
:''Details:'' | |||
:* You can use queues, data value references, and semaphores to prevent race conditions. | |||
:* You can also use functional global variables to prevent race conditions if the functional global variable protects a critical code section containing actions that modify data. | |||
:* However, you cannot use a functional global variable to prevent race conditions if the functional global variable protects sections containing actions that only read and write data. | |||
'' | ;Handle unsupported values appropriately | ||
:Handle all unsupported values appropriately. | |||
: | |||
:''Example:'' | |||
:* If you create an API, consider returning an error for unsupported inputs. | |||
;Avoid creating platform-specific versions of VIs | |||
:When designing multi-platform VIs, avoid creating per-platform versions of a VI. Instead, place platform-specific functionality in a Conditional Disable structure specific to a target. | |||
: | |||
:''Details:'' | |||
:* Specifically, pay attention to Call Library Function Nodes as library file extensions may be different between platforms. If applicable, use an asterisk instead of the library file extension so the same configuration works on different platforms. | |||
''' | ;Avoid using absolute paths | ||
:Avoid using absolute paths. | |||
: | |||
:''Details:'' | |||
:* When possible, either use relative paths and define a root path in your code or determine the root path dynamically at run-time based on system settings or the application location. Ensure that relative file paths work for the operating system on which the code is intended to run. | |||
:* Absolute paths can cause problems when you build an application or run the VI on a different computer. If you must use an absolute path, consider ensuring that you include code to check whether the path exists and to create a path if the path does not exist. | |||
== Layout and Wiring == | |||
;Use a left-to-right and top-to-bottom layout | |||
(VI Analyzer) Use | :([[VI Analyzer]]) Use a left-to-right and top-to-bottom layout. | ||
;Ensure data flows left to right | |||
(VI Analyzer) If | :([[VI Analyzer]]) Wire so data flows from left to right, unless you use feedback nodes. If you need to use vertical wires in addition to horizontal wires, top-to-bottom flow is preferred over bottom-to-top flow when practical. | ||
: | |||
:''Details:'' | |||
:* If your diagram contains a wire from right to left that is not associated with a feedback node, explain that decision using a wire label or an attached label. | |||
;Avoid using long wires unless necessary | |||
:Avoid using long wires unless you have good reasons. If you must use long wires, use wire labels on those wires. | |||
;Wire neatly and efficiently | |||
:([[VI Analyzer]]) Wire neatly and efficiently. Keep the number of bends and wire crossings reasonable. | |||
: | |||
:''Rationale:'' | |||
:* Poor wire organization can make the block diagram difficult to read and debug or make the VI appear to do things it does not do. | |||
'' | ;Arrange objects neatly on the block diagram | ||
:([[VI Analyzer]]) Neatly arrange objects on the block diagram. | |||
: | |||
:''Tip:'' | |||
:* Use the Align Objects and Distribute Objects pull-down menus on the toolbar to arrange objects on the block diagram. | |||
;Avoid leaving front panel terminals unwired | |||
:([[VI Analyzer]]) When possible, avoid leaving front panel terminals unwired on the block diagram. Do not use a variable when you can use a terminal wire to transfer data. | |||
: | |||
:''Rationale:'' | |||
:* LabVIEW is a data flow language, so wires are preferred from the maintainability perspective. Also, every local variable that reads the data makes a copy of the data. | |||
;Align control terminals to the left, indicator terminals to the right | |||
:Align control terminals to the far left and indicator terminals to the far right of the block diagram. Align controls along their right edges and indicators along their left edges. | |||
: | |||
:''Exception:'' | |||
:* This does not apply to indicator terminals used inside structures. | |||
;Lay objects neatly with reasonable spacing: | |||
:Lay objects neatly and with reasonable spacing to create a visually appealing block diagram. Do not wire under objects. Avoid unnecessary white space and overcrowding of the block diagram. Provide just enough white space for visual guidance. | |||
: | |||
:''Tip:'' | |||
:* To increase space between tightly grouped objects, press <Ctrl> and drag in the direction you want to add space. (MacOS) Press <Option>. | |||
:* To reduce space between scattered objects, press <Ctrl-Alt> and drag in the direction you want to remove space. (MacOS) Press <Option-Ctrl>. | |||
== Colors == | |||
;Avoid coloring diagrams | |||
:Avoid coloring diagrams. Color can distract users. | |||
;Use default colors for structures | |||
:Use default colors for structures, such as Case or Event structures. | |||
== Structures == | |||
;Avoid using Sequence structures | |||
:Avoid using Sequence structures unless you must use them to define execution order. | |||
;Arrange parallel loops vertically | |||
:If you have several loops that execute in parallel, arrange them vertically if possible. | |||
;Avoid placing control and indicator terminals inside loops or structures | |||
:Avoid placing control and indicator terminals inside loops or structures unless the values need to be read or updated regularly, like a latched Boolean in its value change event case or a graph in a while loop. | |||
;Set conditional structures wide enough to show full case or event selector | |||
:Set conditional structures such as Case structures and Event structures wide enough to view the full case selector, event selector, or similar text. If you have multiple conditions in the same frame, you may make an exception (and not show all of the text) to avoid increasing the structure width. | |||
;Save VIs with the most important frame of multi-frame structures visible | |||
:Save each VI with the most important frame of multi-frame structures visible. | |||
;Wire selector terminal inside Case structures | |||
:When you use a Case structure, avoid creating a separate tunnel for the wire connected to the selector terminal. Instead, wire the selector terminal inside the structure. | |||
: | |||
:[[File:Case Structure Tunnels.png|frameless]] | |||
;Avoid converting non-Boolean types to Booleans for Case selectors | |||
:Do not convert integers, enums, strings, and error clusters to Booleans only to wire such Booleans into the selectors of Case structures. Use non-Boolean selectors instead. | |||
''Rationale:'' | ;Do not include default case for Case structures wired to enums | ||
:([[VI Analyzer]]) Do not include a default case for Case structures wired to enums. | |||
: | |||
:''Rationale:'' | |||
:* If you add a new element to an enum wired to the default case of a Case structure, the code executes the default case, which is unlikely to be desired behavior. | |||
: | |||
:''Exception:'' | |||
:* You may include a default case if you have an enum with a large number of values and a case structure where non-default cases apply only to a handful of values. | |||
;Use In Place Element structure to modify data structures | |||
:When applicable, use the In Place Element structure to clearly convey that elements of a data structure are getting modified. Use of the In Place Element structure may also be beneficial from the performance perspective. | |||
'' | ;Ensure that For Loops behave as expected if they execute zero times | ||
:Ensure that For Loops behave as expected if they execute zero times. | |||
: | |||
:''Details:'' | |||
:* If necessary, use a shift register to pass a value through the loop in this situation. If you wire a value or a reference to pass through a For Loop, use shift registers instead of tunnels. | |||
;Identify number of times a For Loop executes | |||
:([[VI Analyzer]]) Verify that you can easily identify the number of times a For Loop executes. Avoid using both Auto-indexing and the N terminal to govern iterations of the same For Loop. If you use more than one of these options, you can cause confusion about how many times the loop executes. Be cautious when auto-indexing on multiple arrays, as such arrays may have different sizes. | |||
'' | ;Use Event Structure to monitor UI events instead of polling | ||
Avoid | :([[VI Analyzer]]) Use an Event Structure to monitor UI events and other applicable events instead of polling, where appropriate. | ||
: | |||
:''Details:'' | |||
:* Avoid polling front panel controls when you can use a Value Change event in an Event Structure more appropriately. | |||
:* Place the control terminal for a Value Change event configured for a control in the Value Change event case. | |||
: | |||
:''Exception:'' | |||
:* The following illustration shows a situation in which you can acceptably place the control terminal as a stop button outside the event structure. | |||
;Resize Event Data Nodes to contain only necessary data | |||
:([[VI Analyzer]]) Resize Event Data Nodes to contain only data being used. If the node is not used, resize the node to one element and move it to a corner of the frame. In LabVIEW 2020 and later, you can right-click on the frame to hide the event data nodes entirely (Visible Items >> Event Data Node for This Case). | |||
== Functions == | |||
''' | ;Display the subVI icon instead of the connector pane | ||
:Make sure the subVI icon, rather than the connector pane, is visible on the block diagram. | |||
: | |||
:''Rationale:'' | |||
:* A well-designed subVI icon is more helpful than the connector pane on the block diagram. | |||
: | |||
:''Tip:'' | |||
:* If you see a subVI call with the connector pane, right-click the subVI call, select Visible Items, and make sure that the Terminals option does not contain a checkmark. | |||
'' | ;Display terminals for front panel objects | ||
:([[VI Analyzer]]) Display the terminal for front panel objects on the diagram, not the icon. You may make exceptions for type definitions. Well-designed type definition icons display useful information about the type definitions. | |||
: | |||
:''Tips:'' | |||
:* To make an exception for a type definition, right-click the corresponding terminal and select Show as Icon. | |||
:* Navigate to Tools > Options > Block Diagram to change the default for this option. | |||
;Use built-in LabVIEW string constants | |||
For | :([[VI Analyzer]]) Avoid creating a string constant that contains a single, difficult-to-read value. Use the built-in LabVIEW string constants. For example, use a Space Constant instead of a String Constant with a single space. | ||
;Use Bundle by Name and Unbundle by Name for clusters | |||
Use | :Use the Bundle by Name and Unbundle by Name functions when you access cluster elements. Avoid using the unnamed Bundle and Unbundle functions. | ||
;Show index display for array constants | |||
:([[VI Analyzer]]) Array constants on block diagrams must include index or indices display. Array constants must display all elements of the array and the next empty element, if practical. If only a subset of elements can be displayed, the constant must have a scroll bar. | |||
;Show names for Property, Invoke, and Call Library Function Nodes | |||
:Make sure that Property Node, Invoke Node, Call Library Function Node, and similar nodes are shown with names. If both short and long names are available, use short names to preserve space. | |||
: | |||
:''Exception:'' | |||
:* The Long Names option may be appropriate in certain instances. For example, use the Long Names option for an element if that element shares the same short name with another element. | |||
'' | ;Avoid using named queues and notifiers | ||
:Avoid using named queues and named notifiers. | |||
: | |||
:''Details:'' | |||
:* If possible, pass the reference wire in place of using named queues and notifiers. If you must use named queues and named notifiers, avoid name collisions. | |||
'' | ;Close every reference opened | ||
If you | :Make sure the code closes every reference it opens. If practical, open and close references in the same VI. | ||
: | |||
:''Details:'' | |||
:* You can use subVIs for opening and closing references. If you use subVIs to open or close a reference, pair the subVIs up. Use VI names and icons that reflect these pairings. For example, use pairs of words such as "Open" and "Close" or "Obtain" and "Release." | |||
: | |||
:''Exception:'' | |||
:* You don't need to close references to GObjects because they get closed automatically when the VI reference is closed. | |||
;Use path constants for file locations | |||
:Use path constants instead of string constants to specify the location of files or directories. | |||
: | |||
:''Rationale:'' | |||
:* Unlike strings, path constants format paths using the standard syntax for the platform you use. | |||
== Data Types == | |||
;Avoid using strict type definitions | |||
:Do not use strict type definitions unless the control or indicator is used in multiple UI VIs, and you want to keep consistent appearance in those locations. | |||
;Use type definitions for enums and clusters | |||
Use | :Use type definitions for enums and clusters. | ||
'' | ;Use enums instead of rings | ||
If | :Use enums instead of rings unless you have a strong reason not to. | ||
: | |||
:''Exceptions:'' | |||
:* If you must use a ring control, configure it as a strict type definition so that all menu items update for each use. If you do create a strict type definition, extend the size beyond the longest words to allow for easier expansion of future options. Ring controls allow you to easily interact with front panels if you want to programmatically change the string labels. | |||
:* Use rings instead of enums for controls and indicators on VIs that are part of a public API where the item names must be localized. | |||
;Avoid creating clusters with identical element names | |||
:([[VI Analyzer]]) Avoid creating clusters that contain multiple elements with identical names. | |||
== Timing == | |||
;Provide a mechanism to abort infinite timeouts | |||
:If you use an infinite timeout, consider providing a mechanism to abort the wait. | |||
;Avoid arbitrary timing delays | |||
Avoid | :Avoid using arbitrary timing delays. If an important event executes during a delay, make sure that the important event occurs before proceeding. If you must use a delay, provide a comment about the purpose of the delay and the rationale behind the duration. | ||
== Labels and Comments == | |||
;Document non-obvious constants | |||
:Use a specific and detailed label or attached comment to document constants that contain non-obvious values. | |||
;Use comments to explain non-obvious code | |||
- | :Use comments on the block diagram to explain code when the reasoning behind the code is not obvious. When practical, use constant labels, attached labels, structure labels, or subdiagram labels rather than free labels. | ||
;Do not include default values in constant labels | |||
:Do not include default values in constant labels. This typically comes up when creating constants by right-clicking on function terminals. | |||
;Label shift registers and wires when necessary | |||
:Label shift registers and wires when the content is potentially unclear or confusing. | |||
;Place terminal labels correctly | |||
:Place terminal labels to the middle left of the terminal for controls and to the middle right of the terminal for indicators. | |||
;Use line feeds in comments only for paragraphs | |||
:([[VI Analyzer]]) Use line feeds in comments only to separate paragraphs. | |||
;Use Size to Text only for single-line labels | |||
:([[VI Analyzer]]) Use Size to Text setting only for single-line labels. Size multi-line labels so that all the text is visible and provide extra space at the bottom of a free | |||
;Use the standard application font for labels | |||
:Use the standard application font for labels. | |||
;Use default text and background colors for labels | |||
:([[VI Analyzer]]) Use the default text and background colors for all labels. | |||
: | |||
:''Exceptions:'' | |||
:* You can make exceptions under special circumstances, such as for background color for #CodeRequired and #CodeRecommended labels in templates and sample projects. | |||
== Error Handling == | |||
'' | ;Handle errors appropriately | ||
:Handle errors appropriately. | |||
: | |||
:''Details:'' | |||
:* Carefully consider every place in the code that may generate an error. | |||
:* Add comments to explain any potentially confusing decisions about error handling. | |||
:* Use a consistent error handling strategy. Make sure the program can deal with all error conditions. Determine the actions for errors, such as log, terminate, and/or notify the user. | |||
'' | ;Disable automatic error handling | ||
:([[VI Analyzer]]) Disable automatic error handling for all VIs, including new VIs. Automatic error handling stops execution in the event of an error and waits on an input before continuing. This automatic stopping can cause problems in a deployed system or application. | |||
: | |||
:''Tips:'' | |||
:* Navigate to Tools > Options > Block Diagram > Error Handling to change the default for new VIs. | |||
:* To change the setting on existing VIs, navigate to File > VI Properties > Execution. | |||
: | |||
:''Exception:'' | |||
:* You may use automatic error handling during development, but make sure it is disabled by the build process, so it is not used by a deployed system. | |||
'' | ;Prioritize errors during error merging | ||
:Carefully consider the priority of errors when merging them. Give priority to errors that occurred first unless you have a good reason not to do so. | |||
: | |||
:''Details:'' | |||
:* When using the Merge Errors function, wire the first error to the top input terminal. | |||
;Consider creating a custom error file | |||
:Consider creating a custom error file to contain all the error descriptions for an application or a library. | |||
== Performance == | |||
;Avoid reallocating memory inside loops | |||
(VI Analyzer) | :([[VI Analyzer]]) Unless necessary, avoid including code that reallocates memory inside of loops, such as code that contains the Build Array or Concatenate Strings functions. Reallocating memory inside of loops can cause slow performance. | ||
;Avoid unnecessary type coercions | |||
:([[VI Analyzer]]) Avoid unnecessary type coercions. Type coercions can allocate memory and cause slow performance. | |||
;Avoid unnecessary data copies | |||
:Avoid unnecessary data copies, especially if the data is large. | |||
;Open and close resources outside of loops | |||
:Consider placing code that opens and closes resources, such as DAQ or File I/O code, outside of loops. Repeatedly opening and closing references inside of a loop is inefficient. | |||
;Separate application timing from execution timing | |||
:([[VI Analyzer]]) Make an explicit decision to separate application timing from execution timing. Include code to limit the execution speed of continuously running loops when they don't need to execute at maximum speed. | |||
: | |||
:''Details:'' | |||
:* Application timing is the time your application defines for things to happen. Execution timing is how fast the computer will execute the code. | |||
:* By default, While Loops and For Loops execute as quickly as possible and use all available CPU resources during this time. To preserve system resources, use a blocking mechanism, such as a Wait function or timeout value, to ensure a loop executes only as often as needed. | |||
;Avoid time-consuming code inside Event structures | |||
- | :Avoid using time-consuming code inside the Event structure. Consider using a producer-consumer pattern or a similar pattern instead. | ||
;Use inlining and subroutine priority strategically | |||
:([[VI Analyzer]]) Use inlining and subroutine priority strategically to improve execution speeds. | |||
;Configure For Loop iteration parallelism | |||
:([[VI Analyzer]]) Consider configuring For Loop iteration parallelism to improve performance. | |||
;Use local variables instead of the Value property | |||
:([[VI Analyzer]]) Use a local variable instead of the Value property when needed to update a front panel control or indicator value. | |||
: | |||
:''Details:'' | |||
:* This is often needed in UI VIs to initialize control values at run time. | |||
;Use Get/Set Control Values by Index for front panel updates | |||
:([[VI Analyzer]]) If you perform many updates to the front panel, use the Get Control Values by Index and Set Control Values by Index functions. | |||
;Use the In Place Element Structure for compound data types | |||
:([[VI Analyzer]]) When modifying portions of compound data types, such as arrays and clusters, use the In Place Element Structure instead of individual nodes such as Bundle and Unbundle. | |||
== | == Source Code Distribution == | ||
;Remove breakpoints before distributing VIs | |||
:([[VI Analyzer]]) Remove all breakpoints before distributing VIs to prevent unintended and unwanted halts in execution. | |||
'' | ;Disable debugging to improve performance | ||
:([[VI Analyzer]]) Disable debugging to improve performance. | |||
: | |||
:''Tip:'' | |||
:* Change this setting in the build specification rather than source code if practical. | |||
;Disable automatic error handling on all VIs | |||
:([[VI Analyzer]]) Disable automatic error handling on all VIs. | |||
= Guidelines for LabVIEW RT = | |||
;Use while loops for non-deterministic tasks | |||
:Whenever possible, use while loops, not timed loops, for non-deterministic tasks. | |||
;Use the term "deterministic" instead of "time critical" | |||
:In your documentation, use the term "deterministic" instead of "time critical" to describe code running in timed loops. The term "time critical" is commonly recognized as a VI priority you can use to schedule parallel tasks. | |||
;Use timed structures instead of deterministic priority setting on SubVIs | |||
:Whenever possible, use timed structures instead of a deterministic priority setting on SubVIs. | |||
;Serialize code within timed structures | |||
:Serialize code within timed structures so that it executes in a defined, sequential order. | |||
;Use inline property for VIs in timed structures | |||
:To minimize subVI overhead, use the inline property for VIs in timed structures. | |||
'' | ;Use subroutine priority with Skip Subroutine Call If Busy | ||
- | :When you use subVIs in timed loops that access a shared resource, consider using subroutine priority and the Skip Subroutine Call If Busy setting. | ||
: | |||
:''Tip:'' | |||
:* To turn on Skip Subroutine Call If Busy on a subVI, right-click on the subVI and select the menu option. | |||
;Avoid placing controls or indicators in timed loops | |||
:Avoid placing controls or indicators within timed loops because they execute slowly and non-deterministically. | |||
;Merge errors properly in timed loops | |||
:With timed loops, merge inner left ear error with error input to catch any configuration errors. Also, merge outer right ear error with error outputs. | |||
;Use the Select function instead of a Case structure in deterministic code | |||
:If possible, use the Select function instead of a Case structure in deterministic code. The Select function provides greater determinism. | |||
;Check time-critical loops for lateness | |||
:Check all time-critical loops for lateness. | |||
== Handling Data Guidelines == | |||
;Optimize file I/O performance by establishing appropriate chunk sizes | |||
:If file I/O performance matters, establish the best chunk size for writing and reading. Note that this may vary by target. | |||
;Use RT FIFO functions for streaming data | |||
- | :Use RT FIFO functions instead of RT FIFO-enabled Shared Variables for streaming data. However, you can use RT FIFO-enabled shared variables for current value communication. | ||
;Use the Flush File function to handle critical data | |||
:For critical data, use the Flush File function to flush the file frequently. Reliance and FAT only flush once per second. | |||
;Limit size and quantity of log files | |||
:Limit the size and quantity of log files to improve system reliability. A directory with a large and growing number of files can grow slow and demonstrate changes in system behavior. As a result, you may encounter unexpected behavior. | |||
== Initialization and Shutdown Guidelines == | |||
;Implement shutdown code to stop initialized resources | |||
:Implement shutdown code to stop anything initialized, even if the next step calls for a reboot. | |||
;Avoid writing to configuration files from within the application | |||
:Avoid writing to configuration files from within the application. Writing to configuration files can corrupt the file and prevent you from properly initializing the next reboot. If you must write to a configuration file, develop a strategy to recover from or limit the damage of corruption. | |||
;Place reboot code in a conditional disable structure | |||
:Place code that reboots a controller in a conditional disable structure so you can easily disable the reboot at the end of a program. If you place reboot code in a conditional disable structure, you can disable the code when debugging and enable the code when deploying the application. | |||
== Miscellaneous == | |||
;Use RT Timing palette for real-time timing | |||
:Use Timing VIs from the Real-Time>RT Timing palette instead of the ones from the Programming>Timing palette. | |||
;Monitor processor and memory usage from development through deployment | |||
:Monitor the processor and memory usage for the system from development through deployment. | |||
: | |||
:''Details:'' | |||
:* Ensure processor usage does not stay high long enough to cause unacceptable thread starvation when a thread does not get time to execute. | |||
:* Verify that memory usage does not grow continually and that a plan exists to recover in case memory usage does grow continuously. | |||
= Guidelines for LabVIEW FPGA = | |||
;Keep in mind that top-level VI controls and indicators are resource intensive | |||
:When you plan how to use FPGA resources, keep in mind that top-level VI controls and indicators are resource intensive. | |||
'' | ;Handle errors locally on FPGA | ||
:If you use a node that has an error output, include code to handle the error immediately. | |||
: | |||
:''Details:'' | |||
:* Localized error handling in FPGAs typically results in lower FPGA resource utilization because the error cluster in FPGA consists of 33 bits, one bit for status and 32 for the error code. You can often reduce 33 bits down to one. | |||
;Avoid writing to hardware outputs inside Case structures in timed loops | |||
Avoid | :Avoid writing to hardware outputs inside a Case structure, especially when inside a single-cycle Timed Loop. Instead, explicitly define hardware outputs for each case and write to hardware outputs outside the Case structure. | ||
''Details:'' | ;Monitor DMA FIFO timeouts | ||
- | :Monitor the timeout output of DMA FIFO reads and writes and respond accordingly. | ||
: | |||
:''Details:'' | |||
:* Also monitor the timeout output of target-scoped FIFOs unless you either do not care if a timeout occurs or are certain a timeout will never occur. | |||
:* To handle the length of timeouts, either latch the output and notify the host that the FPGA should be restarted to ensure data integrity or use a handshaking protocol to handle resending data. | |||
;Use 4-Wire handshaking protocol where applicable | |||
:Use 4-Wire handshaking anywhere appropriate, and be sure to label the wires, such as "input valid," "ready for output," "output valid," and "ready for input". | |||
;Convert fractional data types to single precision before sending to host | |||
:Consider converting fractional data types to the single data type before passing them up to the host. | |||
== FPGA Host Interface == | |||
;Call the Reset and Run methods explicitly | |||
:Consider calling the Reset and Run methods specifically instead of automatically running the VI from the Open FPGA Reference function. This ensures the FPGA is in a known state before it executes. | |||
'' | ;Avoid reallocating memory or polling the CPU when reading from DMA FIFOs | ||
- | :When reading from DMA FIFOs, do not reallocate memory or poll the CPU. | ||
: | |||
:''Details:'' | |||
:* Consider using the Configure method to set an appropriate host-side buffer. Avoid using large FPGA size buffers when possible to preserve block RAM. | |||
:* Set the DMA Read timeout to 0. | |||
:* Read a fixed-size number of elements (a multiple of the number of data channels). | |||
:* Wait until the buffer is full before reading elements. | |||
;Use the Dynamic reference type for FPGA APIs | |||
:Use the Dynamic reference type when creating an API that communicates with an FPGA. | |||
= Appendix A: Book Title Case = | |||
''' | ''Source:'' http://labview.ni.com/docs/labview-style/#FileOrganization10 | ||
{| class="wikitable" | |||
! Rule | |||
! Yes | |||
! No | |||
|- | |||
| Capitalize the first word. | |||
| General Error Handler | |||
| General error handler | |||
|- | |||
| Capitalize all nouns, pronouns, adjectives, verbs, adverbs, and subordinate conjunctions (as, because, although). | |||
| General Error Handler | |||
| General error handler | |||
|- | |||
| Capitalize the second part of a hyphenated compound. | |||
| Fixed-Point | |||
| Fixed-point | |||
|- | |||
| Do not capitalize articles (a, an, the), coordinate conjunctions (and, or, nor), or prepositions regardless of length, unless they are the first or last word (exception: capitalize Boolean operators, such as AND, OR, etc). | |||
| Search and Replace | |||
| Search And Replace | |||
|- | |||
| Do not capitalize "to" in an infinitive phrase, unless the phrase is the first word. | |||
| Path to String, To String | |||
| Path To String, to String | |||
|- | |||
| Use industry capitalization. | |||
| PolyBezier, IrDa | |||
| Polybezier, IRDA | |||
|- | |||
| Capitalize all acronyms. | |||
| FIFO, URL | |||
| Fifo, Url | |||
|- | |||
| Use single spaces between words. | |||
| Feedback Node | |||
| FeedbackNode, Feedback Node | |||
|- | |||
| Do not use special characters. | |||
| Search and Replace | |||
| Search & Replace, Search_and_Replace | |||
|- | |||
|} | |||
= Appendix B: International System of Units = | |||
''' | ''Source:'' https://www.bipm.org/utils/common/pdf/si_brochure_8_en.pdf | ||
== | == Table 1. SI Base Units == | ||
{| class="wikitable" | |||
! Quantity | |||
! Name | |||
! Symbol | |||
|- | |||
| length | |||
| metre | |||
| m | |||
|- | |||
| mass | |||
| kilogram | |||
| kg | |||
|- | |||
| time, duration | |||
| second | |||
| s | |||
|- | |||
| electric current | |||
| ampere | |||
| A | |||
|- | |||
| thermodynamic temperature | |||
| kelvin | |||
| K | |||
|- | |||
| amount of substance | |||
| mole | |||
| mol | |||
|- | |||
| luminous intensity | |||
| candela | |||
| cd | |||
|} | |||
== Table 3. Coherent Derived Units in the SI with Special Names and Symbols == | |||
= | {| class="wikitable" | ||
! Derived quantity | |||
! Name | |||
! Symbol | |||
|- | |||
| plane angle | |||
| radian | |||
| rad | |||
|- | |||
| solid angle | |||
| steradian | |||
| sr | |||
|- | |||
| frequency | |||
| hertz | |||
| Hz | |||
|- | |||
| force | |||
| newton | |||
| N | |||
|- | |||
| pressure, stress | |||
| pascal | |||
| Pa | |||
|- | |||
| energy, work, amount of heat | |||
| joule | |||
| J | |||
|- | |||
| power, radiant flux | |||
| watt | |||
| W | |||
|- | |||
| electric charge | |||
| coulomb | |||
| C | |||
|- | |||
| electric potential difference, electromotive force | |||
| volt | |||
| V | |||
|- | |||
| capacitance | |||
| farad | |||
| F | |||
|- | |||
| electric resistance | |||
| ohm | |||
| Ω | |||
|- | |||
| electric conductance | |||
| siemens | |||
| S | |||
|- | |||
| magnetic flux | |||
| weber | |||
| Wb | |||
|- | |||
| magnetic flux density | |||
| tesla | |||
| T | |||
|- | |||
| inductance | |||
| henry | |||
| H | |||
|- | |||
| Celsius temperature | |||
| degree Celsius | |||
| °C | |||
|- | |||
| luminous flux | |||
| lumen | |||
| lm | |||
|- | |||
| illuminance | |||
| lux | |||
| lx | |||
|- | |||
| activity referred to a radionuclide | |||
| becquerel | |||
| Bq | |||
|- | |||
| absorbed dose, specific energy, kerma | |||
| gray | |||
| Gy | |||
|- | |||
| ambient/directional/personal dose equivalent | |||
| sievert | |||
| Sv | |||
|- | |||
| catalytic activity | |||
| katal | |||
| kat | |||
|} | |||
== Table 6. Non-SI Units Accepted for Use with the International System of Units == | |||
Use | |||
{| class="wikitable" | |||
! Quantity | |||
! Name | |||
! Symbol | |||
|- | |||
| rowspan="3" | time | |||
| minute | |||
| min | |||
|- | |||
| hour | |||
| h | |||
|- | |||
| day | |||
| d | |||
|- | |||
| rowspan="3" | plane angle | |||
| degree | |||
| ° | |||
|- | |||
| minute | |||
| ′ | |||
|- | |||
| second | |||
| ″ | |||
|- | |||
| area | |||
| hectare | |||
| ha | |||
|- | |||
| volume | |||
| litre | |||
| L | |||
|- | |||
| mass | |||
| tonne | |||
| t | |||
|} | |||
== Section 5.2 Unit Names == | |||
Unit names are normally printed in roman (upright) type, and they are treated like ordinary nouns. In English, the names of units start with a lower-case letter (even when the symbol for the unit begins with a capital letter), except at the beginning of a sentence or in capitalized material such as a title. In keeping with this rule, the correct spelling of the name of the unit with the symbol °C is “degree Celsius” (the unit degree begins with a lower-case d and the modifier Celsius begins with an upper-case C because it is a proper name). | |||
Although the values of quantities are normally expressed using symbols for numbers and symbols for units, if for some reason the unit name is more appropriate than the unit symbol, the unit name should be spelled out in full. E.g., 2.6 m/s, or 2.6 meters per second. | |||
When the name of a unit is combined with the name of a multiple or sub-multiple prefix, no space or hyphen is used between the prefix name and the unit name. The combination of prefix name plus unit name is a single word. E.g., milligram, not milli-gram. | |||
In both English and French, when the name of a derived unit is formed from the names of individual units by multiplication, then either a space or a hyphen is used to separate the names of the individual units. E.g., pascal second, or pascal-second. | |||
| Line 741: | Line 1,199: | ||
*[http://www.ni.com/pdf/manuals/321393d.pdf LabVIEW Development Guidelines (PDF)] | *[http://www.ni.com/pdf/manuals/321393d.pdf LabVIEW Development Guidelines (PDF)] | ||
*[http://www.amazon.com/LabVIEW-National-Instruments-Virtual-Instrumentation/dp/0131458353 The LabVIEW Style Book (Amazon.com)] | *[http://www.amazon.com/LabVIEW-National-Instruments-Virtual-Instrumentation/dp/0131458353 The LabVIEW Style Book (Amazon.com)] | ||
[[Category:LabVIEW fundamentals]] | [[Category:LabVIEW fundamentals]] | ||
[[Category:Beginner]] | [[Category:Beginner]] | ||
Latest revision as of 13:30, 25 January 2025
The following guidelines are provided as a reference for LabVIEW development. Individuals and organizations are encouraged to cater these to best serve their needs and preferences.
Organization and Names of Files
The following guidance is applicable to all the items and artifacts that are contained within a LabVIEW Project, including VIs and containers such as Projects, Libraries, and Classes.
- Organize all files logically
- You should organize directories and files so that someone with a reasonable skill level is able to navigate the directory structure.
- If you are consistently working on similar projects, you may want to come up with standards for your projects. The authors of this Guide have seen several different and reasonable directory organizations that were appropriate for different projects, which is why this Guide isn't detailed on this topic.
Naming Files and Directories
- Choose names so they are easy to read and describe the purpose of the file or directory
-
- Use names that describe the purpose of the file or directory.
- Use full words except where an abbreviation is well known by the intended audience, such as "USB Port" for "Universal Serial Bus Port".
- Use title case with single space characters between words.
- You may use dashes in situations where dashes are ordinarily used, such as for “Real-Time”.
- Make sure those names work in all relevant platforms.
- Details:
- Refer to Appendix A: Book Title Case for definitions and examples.
- Windows file path length limitation
- When coming up with file and directory names, keep in mind the Windows file path length limitation of 260 characters.
- Avoid special characters in file names
- For greatest cross-platform compatibility and to simplify reading of file names, avoid the use of special characters in file names such as:
-
- File separators like
:(colon)/(forward-slash)\(backward-slash). - Symbols like
¢™$®. - Punctuation marks, parentheses, quotation marks, brackets, and operators like
. , [ ] { } ( ) ! ; " ' * ? < > |. - White space characters such as tabs, new lines, and embedded returns. Note: Spaces are acceptable for most applications.
- File separators like
- Do not use camel-case, Pascal-case, or underscore characters for separation of adjacent words
- Bad:
GRTC.lvprojectGenRTCntrl.lvproj
- Good:
GenericRealTimeControl.lvprojGeneric Real-Time Control.lvprojExitAllOnErr.viExit All on Error.vi
- Use names of control VIs as labels
- Use names of control VIs as labels for corresponding controls. For example, use the label
alarm booleanas the label inAlarm Boolean.ctl.
- Name polymorphic VI instances
- Name polymorphic VI instances by using space-dash-space between the poly VI name and the specific instance designation. For example, if the poly VI is called
Read My Special File.vi, then an instance VI may be calledRead My Special File - I32.vi.
File and Directory Names for Examples, Templates, and Sample Projects
This subsection applies to the examples, templates, and sample projects installed in relevant directories within the LabVIEW directory structure.
- Do not include the word "example" in any file or folder names
- Add a prefix to all example names when developing for a specific driver or addon
- Use the form
<Short Product Name><space><Example Name>. For example,NI-DAQmx Voltage - Continuous Input.vi.
- Avoid deeply nested file folders
- Ensure that none of your project’s file folders on disk are too deeply nested. If the user’s project contains a file with a path that exceeds 260 characters in length (for Windows), the project copy will fail. Aim for having a maximum path length of less than 150 characters so there is plenty of room to account for a user saving their project in a deeply-nested path.
- Name your .lvproj file the same as the folder that contains it
- For templates and sample projects, name your .lvproj file the same as the folder that contains it, e.g., the “PC USRP-RIO Streaming” template folder contains “PC USRP-RIO Streaming.lvproj”.
Project Organization
- Place the top-level VIs for the project directly under appropriate targets
- Place the top-level VIs directly under the appropriate targets. Because you cannot mark a VI as a top-level VI, placing the top-level VIs under the corresponding target helps clarify which VIs are top-level.
- Organize VIs in a hierarchical directory
- Organize VIs in a hierarchical directory with easily accessible top-level VIs and subVIs in subdirectories. Limit the number and level of directories in a project.
- Place all VIs in libraries, classes, or virtual folders
- Avoid using auto-populating folders unless you have a good reason to use them.
- Remove all unused files
- Details:
- Remove all unused files both from the applicable projects/libraries and from the disk.
- Tip:
- Right-click the project root in the Project Explorer window and select Find Items with No Callers from the shortcut menu to display the Find Items with No Callers dialog box. This dialog box identifies all the items you can remove.
Libraries
- Consider using virtual folders to delineate between public and private members of a library
- (VI Analyzer) Consider using virtual folders to delineate between public and private members of a library.
- Place APIs in a library
- Place APIs in a library to improve organization.
- Mark non-API VIs as private
- Mark any VIs in a library as private if they are not part of the API.
LabVIEW Classes
- Name all classes as nouns
- Example:
- Name an example class
Waveform Reader.lvclassrather thanReads Waveforms.lvclass.
- Name an example class
- Name all member VIs of a LabVIEW class as verbs
- Example:
- Name an example member
VI Read Value.virather thanValue.vi.
- Name an example member
- Avoid including the name of the class in VI names
- Example:
- If we have a class
Circleand it needs a VI to return the area, this VI should just be calledCalculate Areaas opposed toCalculate Circle AreaorCircle Calculate Area. Note that LabVIEW provides a namespace for VIs in a library such that it is considered asCircle.lvclass:Calculate Area.vi.
- If we have a class
- Use "Read" for VIs that read data
- Use the word "Read" to begin the name of any VI that strictly reads data from the private data of a class. Avoid using the word "Get" or any synonym of "Get".
- Use "Write" for VIs that bundle data into the private data
- Use the word "Write" to begin the name of any VI that strictly bundles data into the private data of a class. Avoid using the word "Set" or any synonym of "Set".
- Use Book Title Case for class virtual folders and VI names
- Use Book Title Case for all class virtual folders and VI names.
- Details:
- When auto-created by LabVIEW, the class property virtual folder name and the class property VI names may initially match the case of the control label in the class control. Since labels should follow the label guidelines listed in section Control and Indicator Labels/Captions, you may need to change the class property virtual folder and VI names to be Book Title Case.
- The name of a class property virtual folder is used as the name in a class property node.
- Because this is auto-generated by LV and may be tedious to change, this guideline is a recommendation at this time.
- A LabVIEW Developer tool may be created that will correct the auto-generated virtual folder and VI names to match these guidelines.
Monitor Size, Window Size, and Window Placement
- Code should look good on a 1536 x 824 monitor
- Write code so that it looks good on a monitor with 1536 x 824 pixels for most individual file windows, or the target monitor size if designing a UI front panel.
- Details:
- If you have a computer running Windows 10, 1536 x 824 pixels corresponds to 1920 x 1080 pixel resolution with 125% scaling. These are often default settings on a 15" laptop.
- With properly configured LabVIEW.ini tokens you can use the Arrange VI Window Quick Drop (Ctrl-Space, Ctrl-F) to make sure your VI front panel and block diagram windows comply with this guideline.
- VIWin.DisplayWorkspaceRight=1536
- VIWin.DisplayWorkspaceBottom=824
- Save files with minimal white space
- Save files so all relevant content that can be shown is shown without showing a lot of extraneous white space.
- Position window near the upper-left corner of the monitor
- Save files so the upper left corner of the window is close to the upper left corner of the monitor.
VI Window Considerations
- Size the windows so the entire toolbar fits
- (VI Analyzer) Size the windows so the entire toolbar fits.
- Tip:
- Use front panel cleanup to comply with this guideline for front panels. Use Arrange VI Window Quick Drop (Ctrl-Space, Ctrl-F) to comply with this guideline for block diagrams.
- Size front panels and block diagram windows appropriately
- Size the front panel and block diagram windows reasonably for the content and never full-screen.
- Tip:
- Use Arrange VI Window Quick Drop (Ctrl-Space, Ctrl-F) to comply with this guideline.
- Consider sizing panels with tall type definitions
- If a front panel contains a tall type definition cluster, consider sizing the panel to fit existing regular controls and include part of the type definition.
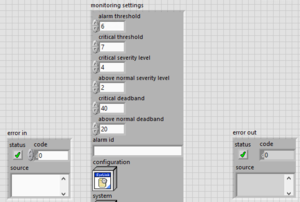

- Include wide type definition clusters in the panel
- If a front panel contains a wide type definition cluster, consider including the cluster below the visible screen and a note indicating that the user can scroll down to see it.

- Entire block diagram should fit on the monitor
- The entire block diagram of a VI should fit on the monitor.
- Details:
- If this guideline is impossible to comply with, write the block diagram so you can read it scrolling in only one direction.
VI, Library, and Class Interfaces
Front Panel
- Set reasonable default values for controls
- Set reasonable default values for controls. Use data type defaults for indicators.
- Avoid overlapping labels and displays
- (VI Analyzer) Avoid overlapping the labels, digital displays, or other parts of controls and indicators.
- Allow for extra space between controls and indicators to account for font changes on different platforms, and for Windows scale and layout settings.
- Overlapped controls and indicators slow down screen updates and can make the control or indicator flicker.
- Use path controls and indicators
- Use path controls and indicators instead of string controls and indicators to specify the location of files or directories.
- Rationale:
- Unlike strings, path controls format paths using the standard syntax for the platform you use.
- Set appropriate browse options for path controls
- When using path controls, set the browse options appropriately. For example, if a path control is intended for existing directories, select the Folders only and Existing only options on the Browse Options page of the Properties dialog box.
GUI VI Front Panels
Note: In this context, a GUI is a VI front panel that is used as a visual part of a UX, for example the visual piece of a LabVIEW-built application or the visual piece of a plug-in to a framework. As a counter-example, VIs that are parts of APIs are not considered GUI VIs, even if they happen to go on palettes.
- Minimize the use of colors
- Minimize the use of colors. Use colors logically and consistently.
- Hide the toolbar
- Hide the toolbar.
- Use consistent control styles
- Use one consistent style for all controls. Use system controls when possible.
- Customize appearance with strict type definitions
- Use custom controls or strict type definition controls to customize the appearance of a control. Use strict type definition controls only to preserve the exact appearance of a control in each location of use.
- Use standard fonts
- (VI Analyzer) Use the standard application, system, and dialog fonts for all user interfaces in the application.
- Details:
- Use the standard font unless you have a specific reason to use a different font. For example, you can use monospace fonts because they are proportionally spaced for string controls and indicators that constrict character use.
- Configure numeric inputs to coerce values
- Configure numeric inputs to coerce values to the valid data range if applicable.
- Arrange controls logically
- Arrange controls from top left to bottom right.
- Details:
- Place controls in the order of typical use. For top-level VIs visible to users, place the most important controls in the most prominent positions.
- Organize UI elements with logical layout
- Organize UI elements using proximity, alignment, decorations, and UI features such as tab controls and subpanels.
- Configure the front panel to fit the monitor
- Configure the front panel to fit the monitor resolution used in the application.
- Details:
- Monitor resolution used in the deployed system may be different from monitors used for development.
- Use labels for controls and indicators
- Use labels to describe the function of controls and indicators. Limit caption use to controls and indicators that require more information than the label conveys or when you need the ability to change the display text of a control programmatically.
Situation Example If the control is visible to the user, use captions to display a long description and add a short label to prevent using valuable space on the block diagram. When you label a ring or slide control with options for volts, ohms, or amperes, selecting a caption such as "select units for display" is more usable than the label V/O/A. Use Property Nodes to change captions programmatically. If you use the VI with the control on multiple platforms, avoid using special characters in control names. Use degree Celsius instead of °C because the ° symbol might not display correctly on all platforms.
- Details:
- Use captions for descriptive text if the label is insufficient.
- Set intuitive keyboard shortcuts
- Set up intuitive keyboard shortcuts and tabbing order for controls.
- Details:
- Some users prefer to use the keyboard instead of a mouse. Consider including keyboard shortcuts for VIs, even if the use of a mouse is available. Set the tabbing order for controls from left to right and top to bottom. Use the <Enter> key for the default control and the <Esc> key for the Cancel button.
- Write descriptions and tip strips
- Write descriptions and create tip strips for UI front panels and controls to describe the purpose of an object and give users instructions for using the object.
Dialog Front Panels
- Use system control style
- (VI Analyzer) Use the system control style when possible to ensure that dialogs look consistent with the operating system.
- Do not use scroll bars on entire front panels
- Do not show scroll bars on the entire front panel windows. Design the dialog box to display all information. Use scroll bars on individual controls and indicators as appropriate.
- Tip:
- Set the VI Window Appearance to Dialog through File > VI Properties.
- Provide meaningful window titles
- Provide a meaningful window title that explains the purpose of the dialog.
- Avoid default menus
- If the dialog has menus, only use menus that are specific to the dialog window. Avoid using default menus.
- Limit dialog box use
- Limit dialog box use to critical user interactions. Avoid overusing dialogs.
- Ensure dialogs are modal or floating
- Make sure that all dialogs are either modal to the main application or floating.
- Use the system panel background color
- Use the system panel background color for dialog user interfaces to maintain consistency.
- Center the dialog on the main monitor
- Center the dialog on the main monitor.
Non-GUI VI Front Panels
- Use default colors for UI elements
- (VI Analyzer) Use the default colors for all UI elements of the front panel.
- Arrange controls and indicators relative to connector pane terminals
- (VI Analyzer) Arrange controls and indicators relative to corresponding connector pane terminals.
- Tip:
- Use Arrange VI Window Quick Drop (Ctrl-Space, Ctrl-F) to arrange the panel objects.
- Group related data into clusters
- Consider grouping related input and output data into clusters. Make the cluster a type definition.
- Use Modern style controls
- Use Modern style controls, except if you use a type definition from a dependency that isn’t a Modern style control.
- Use buttons for Boolean controls and LEDs for Boolean indicators
- Make sure controls look like controls and indicators look like indicators. For example, use buttons for Boolean controls and LEDs for Boolean indicators, except if you use a type definition.
- Use labels, not captions, unless localization is required
- Use control and indicator captions only if you need to localize non-GUI VIs. Otherwise, only use labels.
Control and Indicator Labels/Captions
- Choose descriptive names
- Choose names so they are easy to read and describe the purpose of the control or indicator.
-
- Create names that describe the purpose of the control or indicator.
- Use full words except where an abbreviation is well known by the intended audience, such as "USB Port" for "Universal Serial Bus Port".
- In GUI VIs, use Book Title Case.
- In non-GUI VIs, use all lowercase characters except for proper nouns and common uppercase abbreviations.
- Use single space characters between words.
- You may use dashes in situations where dashes are ordinarily used, such as for "Real-Time."
- Make sure those names work on all relevant platforms.
- Details:
- Refer to Appendix A: Book Title Case for definition and examples.
- In this context, a GUI is a VI front panel that is used as a visual part of a UX, for example, the visual piece of a LabVIEW-built application or the visual piece of a plug-in to a framework. As a counter-example, VIs that are parts of APIs are not considered GUI VIs, even if they happen to go on palettes.
- Avoid duplicate labels
- (VI Analyzer) Avoid using duplicate labels.
- Add "in" and "out" to input/output pairs
- If a VI contains an input and output pair, add a suffix of "in" to the control label and a suffix of "out" to the indicator label. For example, if a VI includes an input called object in, name the corresponding output object out.
- Label error inputs and outputs as "error in" and "error out"
- If a VI has an error input or an error output, label them as "error in" and "error out" exactly as shown, unless there is a specific reason not to.
- Details:
- There is no value in including the default value ("no error") because you never want a different default value for the error input.
- Use parenthesis in labels only for units
- Use parenthesis in labels only to document units of a control or indicator when it makes sense to do so.
- Details:
- Avoid using parenthesis for any other purposes.
- You should not include the default value in the label in parenthesis.
- Use SI units
- When including units in a label, use units approved and documented in The International System of Units.
- Details:
- Refer to Appendix B: International System of Units for a list of conventional units.
- Use "Size to Text" for labels
- Use Size to Text for labels so the text rectangle automatically resizes to accommodate the text you enter. By default, Size to Text is enabled for one line of text.
- Details:
- The three standard fonts (application, system, and dialog) vary depending on the platform. For example, preferences and video driver settings in Windows affect the size of the fonts. Text may appear larger or smaller on different systems. To compensate for font variations, allow extra space for larger fonts and enable the Size to Text option via the label's shortcut menu.
- Use the default Application font for labels
- Use the default Application font with all default cosmetic settings unless you have a good reason not to.
- Use transparent background color for labels
- (VI Analyzer) Use transparent background color for labels.
Free Labels on Front Panels
- Avoid the use of free labels on front panels
- Avoid the use of free labels on front panels except where particularly useful.
- Example Exceptions:
- VI Analyzer template front panels contain useful free labels instructing you what not to change about the controls and indicators.
- Certain globals used as constants contain useful free labels reminding you to save changes to control values as default values.
- Some example programs contain useful instructions on front panels.
- Use carriage returns only to separate paragraphs
- (VI Analyzer) Use carriage returns in free labels only to separate paragraphs.
- Use Size to Text for single-line labels
- (VI Analyzer) If a free label occupies a single line, use Size to Text. Size free labels with multiple lines so that all the text is visible and provide extra space at the bottom of a free label to account for font size changes across platforms.
- Use the standard application font for free labels
- Use the standard application font for free labels unless you have good reasons not to do so.
Classes and Property Nodes
- Support Property Node syntax for data accessors
- Consider supporting the syntax of Property Nodes for data accessor VIs. However, accessors that use Property Node syntax require error terminals and take more time to execute than data accessor VIs without error terminals. Evaluate and choose appropriately for each class.
VI Description
- Describe what the VI does in the VI Description text box
- For each VI intended to be used by others, such as API VIs and examples, describe what the VI does in the VI Description text box.
VI Connector Pane
- Use the 4x2x2x4 connector pane for all VIs
- (VI Analyzer) Use the default 4x2x2x4 connector pane for all VIs, which provides 12 terminals total. This pattern provides a balance of flexibility of terminal location and density of terminals. Connector panes with more terminals (such as 5x3x3x5) can be difficult to wire due to the smaller terminal size. If you find yourself needing to increase the number of terminals on your subVI beyond 12, your subVI may not be sufficiently modular, and may require a redesign.
- Use left terminals for controls and right terminals for indicators
- Use the left terminals for controls and right terminals for indicators. When using the top and bottom terminals, place all controls to the left of indicators.
- Place related controls and indicators at the same relative position
- Place related controls and indicators at the same relative position on the connector pane. For example, if you assign a data in control to the top left terminal, assign the corresponding data out indicator to the top right terminal.
- Ensure consistency for similar controls across APIs
- If a control or indicator serves the same function throughout an API, name the control or indicator consistently and place it in the same position throughout all API connector panes.
- Place paths, references, and classes in the top corners
- (VI Analyzer) Place paths, references, and LabVIEW Classes in the top corners.
- Place error terminals at the bottom corners
- (VI Analyzer) Assign error in and error out terminals to the corresponding bottom left and right terminals.
- Preserve empty terminals for future expansion
- (VI Analyzer) Preserve empty terminals on the connector pane to allow for future expansion.
- Set required terminals for must-wire inputs
- Configure input terminals for parameters that must be wired for the VI to function as Required.
- Set recommended terminals for inputs with good defaults
- Configure input terminals that have good default values as Recommended. If you are not sure whether an input should be required or not, make it Required.
VI, Library, and Class Icons
- Use glyphs for high-visibility VIs
- Use glyphs in icons for VIs that will have high visibility, such as APIs for software products. Use text in icons otherwise.
- Rationale:
- The effort required to create good glyph-based icons is rarely justified for VIs with limited audience.
- Always create standard size (32x32 pixel) icons
- Always create standard size (32x32 pixel) icons.
- Exceptions:
- In very rare cases it may be appropriate to have a shorter icon. For example, if you use an enumeration with names of hardware registers, you may want to use a short icon for a commonly used register-name-to-register-address subVI to preserve block diagram space in subVI call locations.
- Use glyphs from the Glyphs tab in the icon editor when applicable
- Use glyphs from the Glyphs tab in the icon editor when applicable.
- Avoid using colloquialisms in icons
- Avoid using colloquialisms in icons because they may not work across cultures and languages. For example, avoid representing a data logging VI with a picture of a tree branch or a lumberjack. On the other hand, a pencil is generally understood as a utensil for writing.
- Use standard text settings for icons
- Use the following font settings for the text used in icons:
- Font: Small Fonts
- Alignment: Center
- Size: 9
- Center text vertically: Checked
- Capitalize text: Checked
- Color: Black, with a possible exception for the library layer set forth below
- Use text that matches all or part of the VI name
- Use text that matches all or part of the VI name in the icon.
- Limit the text to three lines with a library or class banner
- Limit the text to three lines if a library or class icon banner is included or to four lines otherwise.
- For non-library VIs, use a plain transparent square with a single pixel black border
- For VIs that are not part of a library or class, use a plain transparent square with a single pixel black border as the base layer for the icon.
- For library or class VIs, use a library layer with a black border
- For VIs that are part of a library or class, use a library layer and a plain transparent square with a single pixel black border as the base layers for the icon.
- Use 32x9 pixel rectangles for library/class banners
- Use 32x9 pixel rectangles with black frames for library and class library icons. Position those rectangles at the very top of the 32x32 pixels allocated for the icons.
- Tip:
- Reduce the size of the default library and class icon by three vertical pixels.
- Rationale:
- Taking into account a pixel for the bottom border, this leaves 22 vertical pixels for individual VI icons. If you are using text with the settings specified below, and you have three lines of text, 23 vertical pixels give you two pixels of vertical spacing between the top and text, two pixels of vertical spacing between the lines, and one pixel of vertical spacing between the last line and the bottom border, which makes the text for the individual icon look reasonably good.
- Limit text in the banner to a single line
- Limit text in the banner of the library and class icons to a single line.
- Ensure contrast between front and background colors
- If you put text in the library or class icon banner, make sure there is enough contrast between front and background colors so that you can easily read the text.
- If the library icon background color is light, use black color for the text.
- If the library icon background color is dark, use white color for the text.
LabVIEW Class Wires
- Avoid excessive wire patterns and colors
- Avoid creating excessive wire patterns and colors if you change the wire appearance of a LabVIEW class wire.
- Details:
- The number of colors and patterns in the block diagram window can affect the readability of LabVIEW code. Change the wire appearance of LabVIEW class wires only if necessary to differentiate between other class wires in the block diagram window.
- Use dark colors on the exterior of class wires
- Use dark colors on the exterior of class wires to provide contrast against the white background.
- Use refnum color for wires if the private data contains only refnum types
- If the private data of a class contains only refnum types, use the standard refnum color for the class wire. Locate the color named "Refnum Wire" in the User Colors dialog box for the LabVIEW color picker.
- Note:
- This guideline takes precedence over other wire color guidelines.
- Match class wire color to the icon banner color
- Make the color of the class wire match the color of the class icon banner.
Programming VI Block Diagrams
- Avoid duplicating code
- Avoid duplicating code. Use subVIs or loops, as appropriate, to avoid code duplication.
- Remove unused code
- (VI Analyzer) Remove unused code from block diagrams.
- Avoid race conditions with appropriate synchronization
- Avoid race conditions by using appropriate synchronization techniques.
- Details:
- You can use queues, data value references, and semaphores to prevent race conditions.
- You can also use functional global variables to prevent race conditions if the functional global variable protects a critical code section containing actions that modify data.
- However, you cannot use a functional global variable to prevent race conditions if the functional global variable protects sections containing actions that only read and write data.
- Handle unsupported values appropriately
- Handle all unsupported values appropriately.
- Example:
- If you create an API, consider returning an error for unsupported inputs.
- Avoid creating platform-specific versions of VIs
- When designing multi-platform VIs, avoid creating per-platform versions of a VI. Instead, place platform-specific functionality in a Conditional Disable structure specific to a target.
- Details:
- Specifically, pay attention to Call Library Function Nodes as library file extensions may be different between platforms. If applicable, use an asterisk instead of the library file extension so the same configuration works on different platforms.
- Avoid using absolute paths
- Avoid using absolute paths.
- Details:
- When possible, either use relative paths and define a root path in your code or determine the root path dynamically at run-time based on system settings or the application location. Ensure that relative file paths work for the operating system on which the code is intended to run.
- Absolute paths can cause problems when you build an application or run the VI on a different computer. If you must use an absolute path, consider ensuring that you include code to check whether the path exists and to create a path if the path does not exist.
Layout and Wiring
- Use a left-to-right and top-to-bottom layout
- (VI Analyzer) Use a left-to-right and top-to-bottom layout.
- Ensure data flows left to right
- (VI Analyzer) Wire so data flows from left to right, unless you use feedback nodes. If you need to use vertical wires in addition to horizontal wires, top-to-bottom flow is preferred over bottom-to-top flow when practical.
- Details:
- If your diagram contains a wire from right to left that is not associated with a feedback node, explain that decision using a wire label or an attached label.
- Avoid using long wires unless necessary
- Avoid using long wires unless you have good reasons. If you must use long wires, use wire labels on those wires.
- Wire neatly and efficiently
- (VI Analyzer) Wire neatly and efficiently. Keep the number of bends and wire crossings reasonable.
- Rationale:
- Poor wire organization can make the block diagram difficult to read and debug or make the VI appear to do things it does not do.
- Arrange objects neatly on the block diagram
- (VI Analyzer) Neatly arrange objects on the block diagram.
- Tip:
- Use the Align Objects and Distribute Objects pull-down menus on the toolbar to arrange objects on the block diagram.
- Avoid leaving front panel terminals unwired
- (VI Analyzer) When possible, avoid leaving front panel terminals unwired on the block diagram. Do not use a variable when you can use a terminal wire to transfer data.
- Rationale:
- LabVIEW is a data flow language, so wires are preferred from the maintainability perspective. Also, every local variable that reads the data makes a copy of the data.
- Align control terminals to the left, indicator terminals to the right
- Align control terminals to the far left and indicator terminals to the far right of the block diagram. Align controls along their right edges and indicators along their left edges.
- Exception:
- This does not apply to indicator terminals used inside structures.
- Lay objects neatly with reasonable spacing
- Lay objects neatly and with reasonable spacing to create a visually appealing block diagram. Do not wire under objects. Avoid unnecessary white space and overcrowding of the block diagram. Provide just enough white space for visual guidance.
- Tip:
- To increase space between tightly grouped objects, press <Ctrl> and drag in the direction you want to add space. (MacOS) Press <Option>.
- To reduce space between scattered objects, press <Ctrl-Alt> and drag in the direction you want to remove space. (MacOS) Press <Option-Ctrl>.
Colors
- Avoid coloring diagrams
- Avoid coloring diagrams. Color can distract users.
- Use default colors for structures
- Use default colors for structures, such as Case or Event structures.
Structures
- Avoid using Sequence structures
- Avoid using Sequence structures unless you must use them to define execution order.
- Arrange parallel loops vertically
- If you have several loops that execute in parallel, arrange them vertically if possible.
- Avoid placing control and indicator terminals inside loops or structures
- Avoid placing control and indicator terminals inside loops or structures unless the values need to be read or updated regularly, like a latched Boolean in its value change event case or a graph in a while loop.
- Set conditional structures wide enough to show full case or event selector
- Set conditional structures such as Case structures and Event structures wide enough to view the full case selector, event selector, or similar text. If you have multiple conditions in the same frame, you may make an exception (and not show all of the text) to avoid increasing the structure width.
- Save VIs with the most important frame of multi-frame structures visible
- Save each VI with the most important frame of multi-frame structures visible.
- Wire selector terminal inside Case structures
- When you use a Case structure, avoid creating a separate tunnel for the wire connected to the selector terminal. Instead, wire the selector terminal inside the structure.


- Avoid converting non-Boolean types to Booleans for Case selectors
- Do not convert integers, enums, strings, and error clusters to Booleans only to wire such Booleans into the selectors of Case structures. Use non-Boolean selectors instead.
- Do not include default case for Case structures wired to enums
- (VI Analyzer) Do not include a default case for Case structures wired to enums.
- Rationale:
- If you add a new element to an enum wired to the default case of a Case structure, the code executes the default case, which is unlikely to be desired behavior.
- Exception:
- You may include a default case if you have an enum with a large number of values and a case structure where non-default cases apply only to a handful of values.
- Use In Place Element structure to modify data structures
- When applicable, use the In Place Element structure to clearly convey that elements of a data structure are getting modified. Use of the In Place Element structure may also be beneficial from the performance perspective.
- Ensure that For Loops behave as expected if they execute zero times
- Ensure that For Loops behave as expected if they execute zero times.
- Details:
- If necessary, use a shift register to pass a value through the loop in this situation. If you wire a value or a reference to pass through a For Loop, use shift registers instead of tunnels.
- Identify number of times a For Loop executes
- (VI Analyzer) Verify that you can easily identify the number of times a For Loop executes. Avoid using both Auto-indexing and the N terminal to govern iterations of the same For Loop. If you use more than one of these options, you can cause confusion about how many times the loop executes. Be cautious when auto-indexing on multiple arrays, as such arrays may have different sizes.
- Use Event Structure to monitor UI events instead of polling
- (VI Analyzer) Use an Event Structure to monitor UI events and other applicable events instead of polling, where appropriate.
- Details:
- Avoid polling front panel controls when you can use a Value Change event in an Event Structure more appropriately.
- Place the control terminal for a Value Change event configured for a control in the Value Change event case.
- Exception:
- The following illustration shows a situation in which you can acceptably place the control terminal as a stop button outside the event structure.
- Resize Event Data Nodes to contain only necessary data
- (VI Analyzer) Resize Event Data Nodes to contain only data being used. If the node is not used, resize the node to one element and move it to a corner of the frame. In LabVIEW 2020 and later, you can right-click on the frame to hide the event data nodes entirely (Visible Items >> Event Data Node for This Case).
Functions
- Display the subVI icon instead of the connector pane
- Make sure the subVI icon, rather than the connector pane, is visible on the block diagram.
- Rationale:
- A well-designed subVI icon is more helpful than the connector pane on the block diagram.
- Tip:
- If you see a subVI call with the connector pane, right-click the subVI call, select Visible Items, and make sure that the Terminals option does not contain a checkmark.
- Display terminals for front panel objects
- (VI Analyzer) Display the terminal for front panel objects on the diagram, not the icon. You may make exceptions for type definitions. Well-designed type definition icons display useful information about the type definitions.
- Tips:
- To make an exception for a type definition, right-click the corresponding terminal and select Show as Icon.
- Navigate to Tools > Options > Block Diagram to change the default for this option.
- Use built-in LabVIEW string constants
- (VI Analyzer) Avoid creating a string constant that contains a single, difficult-to-read value. Use the built-in LabVIEW string constants. For example, use a Space Constant instead of a String Constant with a single space.
- Use Bundle by Name and Unbundle by Name for clusters
- Use the Bundle by Name and Unbundle by Name functions when you access cluster elements. Avoid using the unnamed Bundle and Unbundle functions.
- Show index display for array constants
- (VI Analyzer) Array constants on block diagrams must include index or indices display. Array constants must display all elements of the array and the next empty element, if practical. If only a subset of elements can be displayed, the constant must have a scroll bar.
- Show names for Property, Invoke, and Call Library Function Nodes
- Make sure that Property Node, Invoke Node, Call Library Function Node, and similar nodes are shown with names. If both short and long names are available, use short names to preserve space.
- Exception:
- The Long Names option may be appropriate in certain instances. For example, use the Long Names option for an element if that element shares the same short name with another element.
- Avoid using named queues and notifiers
- Avoid using named queues and named notifiers.
- Details:
- If possible, pass the reference wire in place of using named queues and notifiers. If you must use named queues and named notifiers, avoid name collisions.
- Close every reference opened
- Make sure the code closes every reference it opens. If practical, open and close references in the same VI.
- Details:
- You can use subVIs for opening and closing references. If you use subVIs to open or close a reference, pair the subVIs up. Use VI names and icons that reflect these pairings. For example, use pairs of words such as "Open" and "Close" or "Obtain" and "Release."
- Exception:
- You don't need to close references to GObjects because they get closed automatically when the VI reference is closed.
- Use path constants for file locations
- Use path constants instead of string constants to specify the location of files or directories.
- Rationale:
- Unlike strings, path constants format paths using the standard syntax for the platform you use.
Data Types
- Avoid using strict type definitions
- Do not use strict type definitions unless the control or indicator is used in multiple UI VIs, and you want to keep consistent appearance in those locations.
- Use type definitions for enums and clusters
- Use type definitions for enums and clusters.
- Use enums instead of rings
- Use enums instead of rings unless you have a strong reason not to.
- Exceptions:
- If you must use a ring control, configure it as a strict type definition so that all menu items update for each use. If you do create a strict type definition, extend the size beyond the longest words to allow for easier expansion of future options. Ring controls allow you to easily interact with front panels if you want to programmatically change the string labels.
- Use rings instead of enums for controls and indicators on VIs that are part of a public API where the item names must be localized.
- Avoid creating clusters with identical element names
- (VI Analyzer) Avoid creating clusters that contain multiple elements with identical names.
Timing
- Provide a mechanism to abort infinite timeouts
- If you use an infinite timeout, consider providing a mechanism to abort the wait.
- Avoid arbitrary timing delays
- Avoid using arbitrary timing delays. If an important event executes during a delay, make sure that the important event occurs before proceeding. If you must use a delay, provide a comment about the purpose of the delay and the rationale behind the duration.
Labels and Comments
- Document non-obvious constants
- Use a specific and detailed label or attached comment to document constants that contain non-obvious values.
- Use comments to explain non-obvious code
- Use comments on the block diagram to explain code when the reasoning behind the code is not obvious. When practical, use constant labels, attached labels, structure labels, or subdiagram labels rather than free labels.
- Do not include default values in constant labels
- Do not include default values in constant labels. This typically comes up when creating constants by right-clicking on function terminals.
- Label shift registers and wires when necessary
- Label shift registers and wires when the content is potentially unclear or confusing.
- Place terminal labels correctly
- Place terminal labels to the middle left of the terminal for controls and to the middle right of the terminal for indicators.
- Use line feeds in comments only for paragraphs
- (VI Analyzer) Use line feeds in comments only to separate paragraphs.
- Use Size to Text only for single-line labels
- (VI Analyzer) Use Size to Text setting only for single-line labels. Size multi-line labels so that all the text is visible and provide extra space at the bottom of a free
- Use the standard application font for labels
- Use the standard application font for labels.
- Use default text and background colors for labels
- (VI Analyzer) Use the default text and background colors for all labels.
- Exceptions:
- You can make exceptions under special circumstances, such as for background color for #CodeRequired and #CodeRecommended labels in templates and sample projects.
Error Handling
- Handle errors appropriately
- Handle errors appropriately.
- Details:
- Carefully consider every place in the code that may generate an error.
- Add comments to explain any potentially confusing decisions about error handling.
- Use a consistent error handling strategy. Make sure the program can deal with all error conditions. Determine the actions for errors, such as log, terminate, and/or notify the user.
- Disable automatic error handling
- (VI Analyzer) Disable automatic error handling for all VIs, including new VIs. Automatic error handling stops execution in the event of an error and waits on an input before continuing. This automatic stopping can cause problems in a deployed system or application.
- Tips:
- Navigate to Tools > Options > Block Diagram > Error Handling to change the default for new VIs.
- To change the setting on existing VIs, navigate to File > VI Properties > Execution.
- Exception:
- You may use automatic error handling during development, but make sure it is disabled by the build process, so it is not used by a deployed system.
- Prioritize errors during error merging
- Carefully consider the priority of errors when merging them. Give priority to errors that occurred first unless you have a good reason not to do so.
- Details:
- When using the Merge Errors function, wire the first error to the top input terminal.
- Consider creating a custom error file
- Consider creating a custom error file to contain all the error descriptions for an application or a library.
Performance
- Avoid reallocating memory inside loops
- (VI Analyzer) Unless necessary, avoid including code that reallocates memory inside of loops, such as code that contains the Build Array or Concatenate Strings functions. Reallocating memory inside of loops can cause slow performance.
- Avoid unnecessary type coercions
- (VI Analyzer) Avoid unnecessary type coercions. Type coercions can allocate memory and cause slow performance.
- Avoid unnecessary data copies
- Avoid unnecessary data copies, especially if the data is large.
- Open and close resources outside of loops
- Consider placing code that opens and closes resources, such as DAQ or File I/O code, outside of loops. Repeatedly opening and closing references inside of a loop is inefficient.
- Separate application timing from execution timing
- (VI Analyzer) Make an explicit decision to separate application timing from execution timing. Include code to limit the execution speed of continuously running loops when they don't need to execute at maximum speed.
- Details:
- Application timing is the time your application defines for things to happen. Execution timing is how fast the computer will execute the code.
- By default, While Loops and For Loops execute as quickly as possible and use all available CPU resources during this time. To preserve system resources, use a blocking mechanism, such as a Wait function or timeout value, to ensure a loop executes only as often as needed.
- Avoid time-consuming code inside Event structures
- Avoid using time-consuming code inside the Event structure. Consider using a producer-consumer pattern or a similar pattern instead.
- Use inlining and subroutine priority strategically
- (VI Analyzer) Use inlining and subroutine priority strategically to improve execution speeds.
- Configure For Loop iteration parallelism
- (VI Analyzer) Consider configuring For Loop iteration parallelism to improve performance.
- Use local variables instead of the Value property
- (VI Analyzer) Use a local variable instead of the Value property when needed to update a front panel control or indicator value.
- Details:
- This is often needed in UI VIs to initialize control values at run time.
- Use Get/Set Control Values by Index for front panel updates
- (VI Analyzer) If you perform many updates to the front panel, use the Get Control Values by Index and Set Control Values by Index functions.
- Use the In Place Element Structure for compound data types
- (VI Analyzer) When modifying portions of compound data types, such as arrays and clusters, use the In Place Element Structure instead of individual nodes such as Bundle and Unbundle.
Source Code Distribution
- Remove breakpoints before distributing VIs
- (VI Analyzer) Remove all breakpoints before distributing VIs to prevent unintended and unwanted halts in execution.
- Disable debugging to improve performance
- (VI Analyzer) Disable debugging to improve performance.
- Tip:
- Change this setting in the build specification rather than source code if practical.
- Disable automatic error handling on all VIs
- (VI Analyzer) Disable automatic error handling on all VIs.
Guidelines for LabVIEW RT
- Use while loops for non-deterministic tasks
- Whenever possible, use while loops, not timed loops, for non-deterministic tasks.
- Use the term "deterministic" instead of "time critical"
- In your documentation, use the term "deterministic" instead of "time critical" to describe code running in timed loops. The term "time critical" is commonly recognized as a VI priority you can use to schedule parallel tasks.
- Use timed structures instead of deterministic priority setting on SubVIs
- Whenever possible, use timed structures instead of a deterministic priority setting on SubVIs.
- Serialize code within timed structures
- Serialize code within timed structures so that it executes in a defined, sequential order.
- Use inline property for VIs in timed structures
- To minimize subVI overhead, use the inline property for VIs in timed structures.
- Use subroutine priority with Skip Subroutine Call If Busy
- When you use subVIs in timed loops that access a shared resource, consider using subroutine priority and the Skip Subroutine Call If Busy setting.
- Tip:
- To turn on Skip Subroutine Call If Busy on a subVI, right-click on the subVI and select the menu option.
- Avoid placing controls or indicators in timed loops
- Avoid placing controls or indicators within timed loops because they execute slowly and non-deterministically.
- Merge errors properly in timed loops
- With timed loops, merge inner left ear error with error input to catch any configuration errors. Also, merge outer right ear error with error outputs.
- Use the Select function instead of a Case structure in deterministic code
- If possible, use the Select function instead of a Case structure in deterministic code. The Select function provides greater determinism.
- Check time-critical loops for lateness
- Check all time-critical loops for lateness.
Handling Data Guidelines
- Optimize file I/O performance by establishing appropriate chunk sizes
- If file I/O performance matters, establish the best chunk size for writing and reading. Note that this may vary by target.
- Use RT FIFO functions for streaming data
- Use RT FIFO functions instead of RT FIFO-enabled Shared Variables for streaming data. However, you can use RT FIFO-enabled shared variables for current value communication.
- Use the Flush File function to handle critical data
- For critical data, use the Flush File function to flush the file frequently. Reliance and FAT only flush once per second.
- Limit size and quantity of log files
- Limit the size and quantity of log files to improve system reliability. A directory with a large and growing number of files can grow slow and demonstrate changes in system behavior. As a result, you may encounter unexpected behavior.
Initialization and Shutdown Guidelines
- Implement shutdown code to stop initialized resources
- Implement shutdown code to stop anything initialized, even if the next step calls for a reboot.
- Avoid writing to configuration files from within the application
- Avoid writing to configuration files from within the application. Writing to configuration files can corrupt the file and prevent you from properly initializing the next reboot. If you must write to a configuration file, develop a strategy to recover from or limit the damage of corruption.
- Place reboot code in a conditional disable structure
- Place code that reboots a controller in a conditional disable structure so you can easily disable the reboot at the end of a program. If you place reboot code in a conditional disable structure, you can disable the code when debugging and enable the code when deploying the application.
Miscellaneous
- Use RT Timing palette for real-time timing
- Use Timing VIs from the Real-Time>RT Timing palette instead of the ones from the Programming>Timing palette.
- Monitor processor and memory usage from development through deployment
- Monitor the processor and memory usage for the system from development through deployment.
- Details:
- Ensure processor usage does not stay high long enough to cause unacceptable thread starvation when a thread does not get time to execute.
- Verify that memory usage does not grow continually and that a plan exists to recover in case memory usage does grow continuously.
Guidelines for LabVIEW FPGA
- Keep in mind that top-level VI controls and indicators are resource intensive
- When you plan how to use FPGA resources, keep in mind that top-level VI controls and indicators are resource intensive.
- Handle errors locally on FPGA
- If you use a node that has an error output, include code to handle the error immediately.
- Details:
- Localized error handling in FPGAs typically results in lower FPGA resource utilization because the error cluster in FPGA consists of 33 bits, one bit for status and 32 for the error code. You can often reduce 33 bits down to one.
- Avoid writing to hardware outputs inside Case structures in timed loops
- Avoid writing to hardware outputs inside a Case structure, especially when inside a single-cycle Timed Loop. Instead, explicitly define hardware outputs for each case and write to hardware outputs outside the Case structure.
- Monitor DMA FIFO timeouts
- Monitor the timeout output of DMA FIFO reads and writes and respond accordingly.
- Details:
- Also monitor the timeout output of target-scoped FIFOs unless you either do not care if a timeout occurs or are certain a timeout will never occur.
- To handle the length of timeouts, either latch the output and notify the host that the FPGA should be restarted to ensure data integrity or use a handshaking protocol to handle resending data.
- Use 4-Wire handshaking protocol where applicable
- Use 4-Wire handshaking anywhere appropriate, and be sure to label the wires, such as "input valid," "ready for output," "output valid," and "ready for input".
- Convert fractional data types to single precision before sending to host
- Consider converting fractional data types to the single data type before passing them up to the host.
FPGA Host Interface
- Call the Reset and Run methods explicitly
- Consider calling the Reset and Run methods specifically instead of automatically running the VI from the Open FPGA Reference function. This ensures the FPGA is in a known state before it executes.
- Avoid reallocating memory or polling the CPU when reading from DMA FIFOs
- When reading from DMA FIFOs, do not reallocate memory or poll the CPU.
- Details:
- Consider using the Configure method to set an appropriate host-side buffer. Avoid using large FPGA size buffers when possible to preserve block RAM.
- Set the DMA Read timeout to 0.
- Read a fixed-size number of elements (a multiple of the number of data channels).
- Wait until the buffer is full before reading elements.
- Use the Dynamic reference type for FPGA APIs
- Use the Dynamic reference type when creating an API that communicates with an FPGA.
Appendix A: Book Title Case
Source: http://labview.ni.com/docs/labview-style/#FileOrganization10
| Rule | Yes | No |
|---|---|---|
| Capitalize the first word. | General Error Handler | General error handler |
| Capitalize all nouns, pronouns, adjectives, verbs, adverbs, and subordinate conjunctions (as, because, although). | General Error Handler | General error handler |
| Capitalize the second part of a hyphenated compound. | Fixed-Point | Fixed-point |
| Do not capitalize articles (a, an, the), coordinate conjunctions (and, or, nor), or prepositions regardless of length, unless they are the first or last word (exception: capitalize Boolean operators, such as AND, OR, etc). | Search and Replace | Search And Replace |
| Do not capitalize "to" in an infinitive phrase, unless the phrase is the first word. | Path to String, To String | Path To String, to String |
| Use industry capitalization. | PolyBezier, IrDa | Polybezier, IRDA |
| Capitalize all acronyms. | FIFO, URL | Fifo, Url |
| Use single spaces between words. | Feedback Node | FeedbackNode, Feedback Node |
| Do not use special characters. | Search and Replace | Search & Replace, Search_and_Replace |
Appendix B: International System of Units
Source: https://www.bipm.org/utils/common/pdf/si_brochure_8_en.pdf
Table 1. SI Base Units
| Quantity | Name | Symbol |
|---|---|---|
| length | metre | m |
| mass | kilogram | kg |
| time, duration | second | s |
| electric current | ampere | A |
| thermodynamic temperature | kelvin | K |
| amount of substance | mole | mol |
| luminous intensity | candela | cd |
Table 3. Coherent Derived Units in the SI with Special Names and Symbols
| Derived quantity | Name | Symbol |
|---|---|---|
| plane angle | radian | rad |
| solid angle | steradian | sr |
| frequency | hertz | Hz |
| force | newton | N |
| pressure, stress | pascal | Pa |
| energy, work, amount of heat | joule | J |
| power, radiant flux | watt | W |
| electric charge | coulomb | C |
| electric potential difference, electromotive force | volt | V |
| capacitance | farad | F |
| electric resistance | ohm | Ω |
| electric conductance | siemens | S |
| magnetic flux | weber | Wb |
| magnetic flux density | tesla | T |
| inductance | henry | H |
| Celsius temperature | degree Celsius | °C |
| luminous flux | lumen | lm |
| illuminance | lux | lx |
| activity referred to a radionuclide | becquerel | Bq |
| absorbed dose, specific energy, kerma | gray | Gy |
| ambient/directional/personal dose equivalent | sievert | Sv |
| catalytic activity | katal | kat |
Table 6. Non-SI Units Accepted for Use with the International System of Units
| Quantity | Name | Symbol |
|---|---|---|
| time | minute | min |
| hour | h | |
| day | d | |
| plane angle | degree | ° |
| minute | ′ | |
| second | ″ | |
| area | hectare | ha |
| volume | litre | L |
| mass | tonne | t |
Section 5.2 Unit Names
Unit names are normally printed in roman (upright) type, and they are treated like ordinary nouns. In English, the names of units start with a lower-case letter (even when the symbol for the unit begins with a capital letter), except at the beginning of a sentence or in capitalized material such as a title. In keeping with this rule, the correct spelling of the name of the unit with the symbol °C is “degree Celsius” (the unit degree begins with a lower-case d and the modifier Celsius begins with an upper-case C because it is a proper name).
Although the values of quantities are normally expressed using symbols for numbers and symbols for units, if for some reason the unit name is more appropriate than the unit symbol, the unit name should be spelled out in full. E.g., 2.6 m/s, or 2.6 meters per second.
When the name of a unit is combined with the name of a multiple or sub-multiple prefix, no space or hyphen is used between the prefix name and the unit name. The combination of prefix name plus unit name is a single word. E.g., milligram, not milli-gram.
In both English and French, when the name of a derived unit is formed from the names of individual units by multiplication, then either a space or a hyphen is used to separate the names of the individual units. E.g., pascal second, or pascal-second.